Best Practices

Adding a Second Set of LifePak Data

Scenario: An AFRA does an EKG and a set of vitals on a patient, and then turns the patient over to an ALS transport unit for the transport (and the rest of the patient report) Each set of data from the two LifePaks may be uploaded and then both pay be imported into the same patient report.

  • Import the first data set from MCELITE into the patient report.
  • Import the second data set from MCELITE into the patient report.

The most important part of the that, for the person importing the data, is to look at the name of the LifePak/Unit in MCELITE before downloading.

Knowing the Difference between Closed Call and Non-Closed Call Rules

There are two types of validation rules:

  • Closed Call Rules — You may not post the patient report without filling in these fields. Note the circle with a slash on the right side of the validation rule.
    Elite Validation Rule


  • Non-Closed Call Rules — You may post the patient report without filling in these fields (but ask yourself if the quality of the report is suffering without the data before you post). Note that there is no circle with a slash on this one.
    Elite Validation Rule


Note: Of course, you should be adding all relevant details from the call into your report (required or not). Please refer back to your training about report-writing and narratives for proper technique.

Choosing the Right Selection in Elite When Your Hospital (or FROMS) Isn’t Listed

Scenario: The rookie on your shift hurt himself doing something too embarrassing to note here. It’s not serious enough of an injury to go to the hospital but you are taking him to FROMS. FROMS isn’t listed along with the hospitals in Elite.

The destination name you should choose is Other Facility – 888. The same applies if you are going to any hospital not listed. Please remember to provide the extra detail in your narrative.

Elite Destination Name Field

Enabling Visio to Open FRS Stencils (Shapes)

Visio 2013, be default, will block the FRS Stencils/Shapes (which include gas, electric, connections, north arrow and more) since they were created in much older versions of the program. Follow these steps to tell Visio they are acceptable files to open. (Note: This must be done within the profile of anyone who logs in to use Visio for mapping, not just once per computer.)

  • Run Visio.
  • Click Blank Drawing and click the Create button.
  • Access the File tab and click Options at the bottom of the left-hand navigation.
  • Click Trust Center at the bottom of the left-hand navigation on the pop-up window.
  • Click the Trust Center Settings button on the right side of the pop-up window.
  • Click File Block Settings on the left side navigation.
  • Uncheck the boxes for all three rows. (A checked box means Visio should block it, not unblock it.)
  • Click the two OK buttons.

Sending a Message to ECC via P1 MDC

Need to contact someone at ECC while you are on an incident? No need to remember any workstations or who’s who with P1 MDC!

  • Go to the Mail feature, click the New button at the bottom of the screen and choose Message.
  • Click the To button to select a message recipient.
  • Choose My Dispatcher, which should be located at the top of the list.
  • Click the right arrow/triangle button to address the message to My Dispatcher.
  • Click the OK button.
  • Fill in the message as needed and click the Send button at the bottom of the screen.

Note from the ECC leadership: The My Dispatcher address goes to all at ECC.  For our own procedures, we do not want messages targeting individuals, as was the standard in the previous CAD.

Using PremierOne to Update Your Log Book

Interested in using PremierOne to update your log book? You may use either the MDC or the station P1 desktop — remember, it’s the same software and the only difference is the presence/absence of status buttons at the top.

Run an Incident Recall

  • Got to the Unit Status screen.
  • Click the Options button at the bottom-right corner of the screen and choose Search and Incident Recall.
  • Input/select criteria as you see fit and click the Search button at the bottom of the screen.
  • Double-click/tap an incident and you’ll see the information you need (e.g., incident type, location, incident number, units).
  • Click buttons on the left side of the screen for related information (e.g., Incident History).
  • Click/tap the Close View button at the bottom of the screen when you are finished.

Notes:

  • If you input %708 as the Unit ID, the % acts as a wildcard and you would get information on all calls run by units from Station 8.
  • If you input FS08 as the Unit ID, you will retrieve a list of incidents from Station 8’s area (including calls run by units from other stations).

Exchanging Units

Background

Currently Station Officers have the discretion to exchange units. For example, when PE725 is dispatched on an ALS1 call on Bel Pre Road the Station Officer has the discretion to send T725 instead. Historically when this happened ECC would exchange the units and preempt (clear) the unit not responding on the call. Nothing has changed in this process. The entire exchange process is executed by ECC.

Impact

Since the implementation of new CAD there have been multiple occasions where units have attempted to preempt themselves from incidents via their MDC. What has happened in some of those cases is that the entire incident has been inadvertently cleared. Once the incident is cleared it disappears from the dispatcher’s screen, dramatically increasing the chances of a service delay.

Take Away

DO NOT attempt to execute unit exchanges via the MDC.  Always allow ECC to execute ALL unit exchanges.

Choosing Battalions for Your Unit Status List in the P1 Mobile

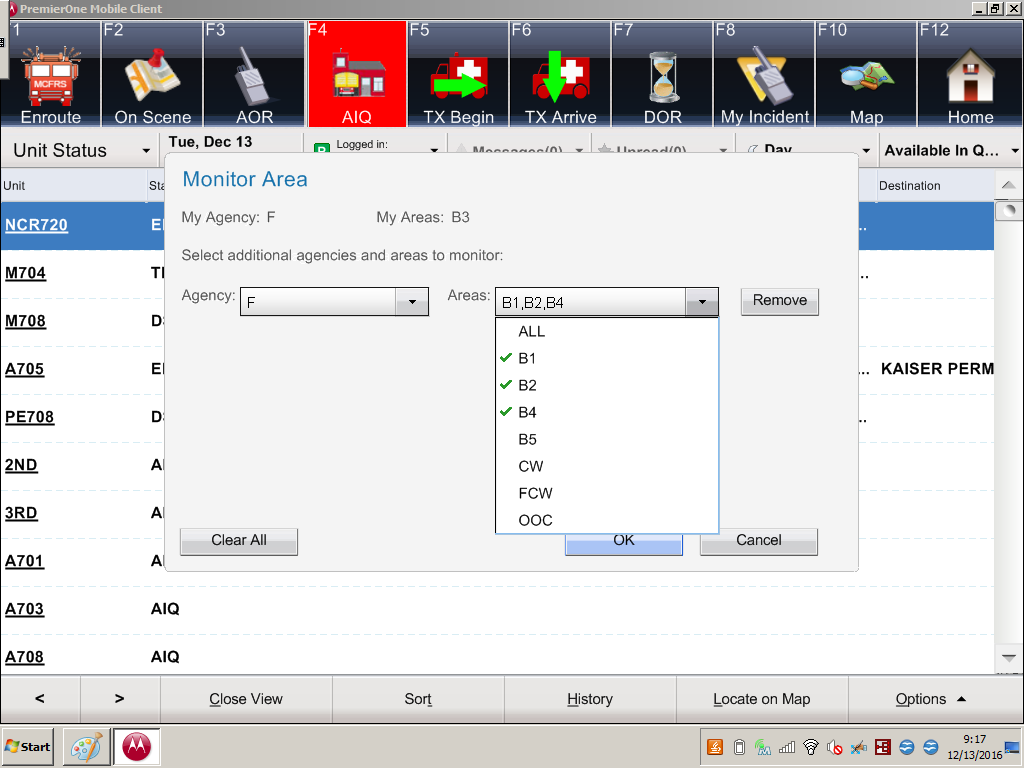
When you log onto the PremierOne (P1) MDC, you get a list of units and their statuses. You might see your battalion (Area in P1-ese) and you might see more than your battalion. Here are the steps to control which battalions you see:

  • Click the Options button in the bottom-right corner.
  • Select Monitor Area.
  • Click the Areas drop-down list and click to select any area you would like to include (or click it again to uncheck that battalion).

    P1 - Monitor Area List

  • Click the OK button.

Stopping Your Visio Map from Expanding into a New Page

Like other Microsoft software, Visio likes to help sometimes and it may differ from your undersanding of the word. One common way of helping is to create new pages automatically for you if you get too close to the margins.

As map makers, you want your drawings to be close to the margins but without making new pages.

To turn this feature off:

  • Switch the Design tab.
  • Find the Auto Size button on the left side of the ribbon.
  • Click the button. It is a toggle, so it will turn back on if you prefer it to be enabled.

    Auto Size button