Reserving an FRS Conference Room at PSHQ

Need to reserve a conference room at headquarters? The process is simple, but please note that certain rooms are restricted and this process is not for those rooms. The list below only shows the rooms which are not restricted. (Note: There is a small sign posted inside each conference room near the door with the Outlook name of the room, for your convenience.)

  • Start a meeting request in Outlook.
  • List out the names/addresses of the individuals you would like to add.
  • Include the name of the conference room in the Required section, along with the names.
    • &PSHQ.FRS Atrium Shared (Atrium)
    • &PSHQ.FRS Fiscal Mgt Conf (Fiscal Services)
    • &PSHQ.FRS OPS Conf Rm (Operations)
    • &PSHQ.FRSVolSvcsConf (Volunteer Services)
  • Send the meeting request.


Retrieving a Collision Report in Risk MAP

Are you a BC who needs to retrieve a collision report? Did you start a report and now, a while later, need to complete it?

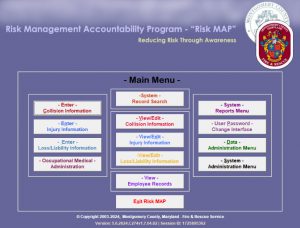
  • Log into Risk MAP to see the main menu.

    Main Menu for Risk MAP

  • Find and click the View/Edit Collision Information button in the middle column.

    View Collision Report Button

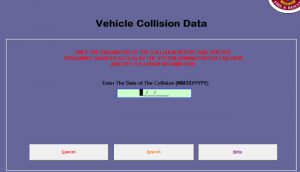
  • Click the date field in the middle of the screen. Note: Input the date of the collision (which would have been entered by the report writer), not the current date.

    Risk MAP Date Field

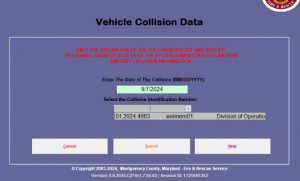
  • Press the Tab key on your keyboard to make the resulting drop-down list appear.
  • Click the drop-down arrow below the date to see the reports associated with that date. There may or may not be more than one report. The info listed for each report will be:
    • Risk MAP report number
    • Single sign-on username of the report author
    • Division selected within the report (specifically the division to which the vehicle in question is associated)
  • Click to select the report you would like to open. (Note: Do not click the Search button.)Risk MAP List of Reports
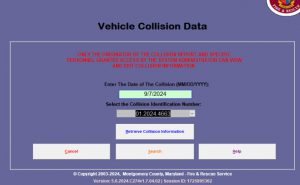
  • Click the Retrieve Collision Information button that appears below the report number.Risk MAP Report Identified
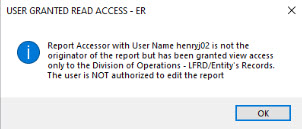
  • Note the dialog box that appears if you are not the author of the report you are about to open. (Note: If you are the report author, you will get a different dialog box which indicated you are the originator of the report.)

    Risk MAP Open Report Warning

  • Click the OK button to open the report.

Note: All access and changes are logged behind the scenes in Risk MAP. Be careful not to make any changes to any fields if you are simply viewing a report.

Synching Your County PC with Intune for Updated Policies

Scenario: FRS IT has told you that your PC needs to be re-synched with the county for updated Intune policies.

  • Click the Windows start key/flag on your keyboard.
  • Type Settings and press the Enter key.
  • Choose Accounts.
  • Click Access Work or School on the left-side navigation.
  • Find and click Connected to MCGOV AD Domain near the top of the screen.
    Connected to MCGOV Settings Button
  • Click the Info button that appears.
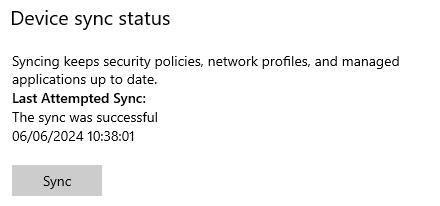
  • Scroll to the Device Sync Status section of the screen and click the Sync button.
    Settings Sync Button

Changing or Removing Your Microsoft Program Avatar

Are you looking for a way to remove the picture you have as your Microsoft avatar? Are you currently represented as your favorite sports team logo, cartoon character or hand gesture to express your frustration because you can’t figure out whether Bingo was the name of the farmer or the dog?

The ideal way to fix this and follow county guidelines is through the Teams app (which should load on any county computer once you have signed in). If Teams doesn’t come up on your computer, just search for it with the other programs.

  • Find and click your avatar at the top-right corner of the screen.
  • Click your picture in the resulting box.
  • Click Remove to have just your initials appear in place of your pic or click Upload to replace with a pic of yourself.

Note: You can only change the pic in Outlook Web, not remove it entirely. You can only remove it via the Teams app.

If you are stuck and just can’t get this to work, please submit a TSR.

Finding a Caller’s Phone Number to Get More Information

Scenario: You have been dispatched on a call and need more information from the caller. Did you know that you may bypass ECC and just call the individual yourself, using the apparatus Sonim phone?

  • Find the incident on the incident screen if you are not already seeing the incident summary.
  • Click the Persons tab, located in the vertical navigation on the left side of the screen.
    P1 MDC Persons Tab
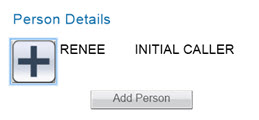
  • Click the + symbol next to the person’s name.
    P1 MDC Caller's Name
  • Find the caller’s phone number on the right side of the screen, if available.

Setting up an MCFRS Active911 Account

Would you like to set up an Active911 account with MCFRS? The process is simple, but some people need clarification. To make things easier on everyone involved, here is what you need to know:

  • Ensure you have met the prerequisite: You are either on the IECS list or you are serving in an admin role and have the permission of a chief within MCFRS.
  • Submit a TSR:
    • Ensure you choose the proper category: Messaging
    • Provide your phone type (just tell us Android or iPhone, please) if you do not have an Active911 account elsewhere
    • Provide your device code if you do have an account elsewhere
  • Look for the closed TSR ticket notification. In that message, the tech will provide you with a device code. You will need that.
  • Download and open the Active911 app for your phone/tablet.
  • Find and click the Pay Individual Subscription button, located below the username and password boxes when you launch the app.

    Active911 Pay Button

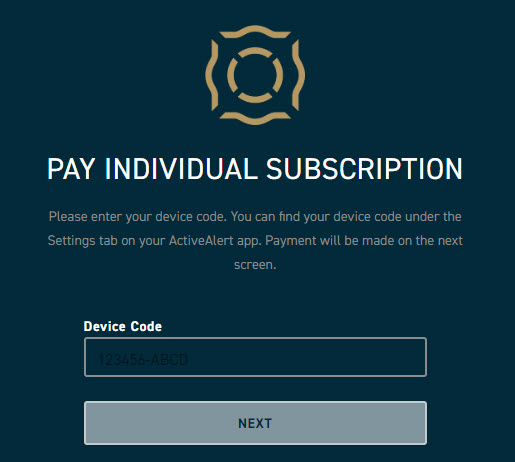
  • Enter the Device Code in the Device Code box and click the Next button. Set up your payment and login information.

    Active911 Pay Setup Screen

    Note: If you do not pay for your subscription within a couple weeks, you will be in danger of having it deleted. In order to keep the database clean, users who have not subscribed are warned in a monthly e-mail message that accounts will be deleted by a date noted in the message.

Changing Your Mail Options for an Outlook Group

Have you joined (or been forcibly assigned to) an Outlook Group? By default, you may automatically be receiving any and all e-mail sent to the group address. However, you have some options and may limit how much of the mail you receive. Even if you choose not to receive any, it will always be available in the group inbox for you to see when you so choose.

Outlook Desktop Directions:

  • Open Outlook Desktop.
  • Scroll to the bottom of the inbox folder list and click once on the Outlook Group for which you need to change the mail options.
  • Note the change to the ribbon  at the top of the screen. One of the items should be Group Settings.
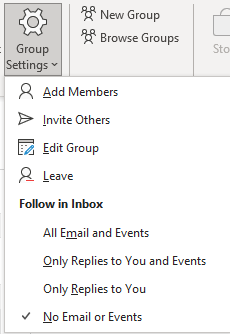
  • Click on the Group Settings button and note your options under the heading Follow in Inbox:
    Outlook Group E-Mail Settings
  • Choose No Email or Events if you do not want to receive any of the e-mail in your own inbox. Choose a different options as you see fit.

Outlook Web Directions:

  • Open Outlook Web.
  • Scroll to the bottom of the inbox folder list and click once on the Outlook Group for which you need to change the mail options.
  • Note the screen is now in three columns. In the middle column, you should see the name of the group. In the example below, the group name is _FRS_Defect_Pictures.
    Outlook Group OWA Screen 1
  • Click the ellipsis () found on the same row as Send email and choose Settings from the pop-up list.
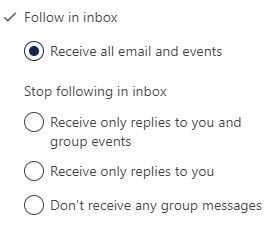
  • Note the new panel that has appeared on the right side of the screen.
    Outlook Group OWA Settings
  • Choose No Email or Events if you do not want to receive any of the e-mail in your own inbox. Choose a different options as you see fit.
  • Click the X at the top of the Group Settings panel to close it (or just click elsewhere on the screen to close the panel).