Common Questions

Choosing Battalions for Your Unit Status List in the P1 Mobile

When you log onto the PremierOne (P1) MDC, you get a list of units and their statuses. You might see your battalion (Area in P1-ese) and you might see more than your battalion. Here are the steps to control which battalions you see:

  • Click the Options button in the bottom-right corner.
  • Select Monitor Area.
  • Click the Areas drop-down list and click to select any area you would like to include (or click it again to uncheck that battalion).

    P1 - Monitor Area List

  • Click the OK button.

Stopping Your Visio Map from Expanding into a New Page

Like other Microsoft software, Visio likes to help sometimes and it may differ from your undersanding of the word. One common way of helping is to create new pages automatically for you if you get too close to the margins.

As map makers, you want your drawings to be close to the margins but without making new pages.

To turn this feature off:

  • Switch the Design tab.
  • Find the Auto Size button on the left side of the ribbon.
  • Click the button. It is a toggle, so it will turn back on if you prefer it to be enabled.

    Auto Size button

Charging the CF-20 Toughbook

As you may have noticed, there are two charger ports for the CF-20 — one on the tablet and one on the base/keyboard.

  • If you plug in the charger on the tablet port, only the tablet receives the charge. (You will see a charge light for the tablet and a red light for the keyboard.)
  • If you plug in the charger on the base/keyboard, both receive the charge. (You will see a charge light for the tablet and another yellow charge light for the keyboard.)

Reattaching the CF-20 Tablet to the Keyboard

You have been working with the CF-20 as a tablet and want to reattach it to the keyboard.

With the computer unfolded as though it were attached and the screen was separated at about a 90 degree angle from the screen:

  • Ensure you are facing the keyboard and that the screen is level with the tablet screen facing you, parallel to you.
  • Align the screen above its dock.
    • The bottom of the tablet is this:
      CF-20 Tablet Screen
    • The docking mechanism on the keyboard/bottom half of the computer is this:CF-20 Computer Bottom Half
  • Press down evenly and simultaneously on both sides until you hear each side click into place.


Separating the CF-20 Tablet from the Keyboard

If you find the Toughbook CF-20 bulky for use while writing your eMEDS patient report, you may want to consider separating the tablet from the keyboard and just carrying the tablet with you.

Note two things first:

CF-20 Lock and Release Switches


  1. The lock/unlock switch: Make sure that you flip the switch up to unlock the device before you attempt to separate the tablet from the keyboard. In the image above, the switch is in the locked position.
  2. Release switch: Slide the Release Switch to the right (as far as it will go) and it will stop in place. If it jumps back to the left, you have not fully released the tablet.

After you have addressed both of these, the screen/tablet lifts straight upward and away from the rest of the device. (Remember not to leave the keyboard in the hospital, the patient’s home/incident location or elsewhere that is not under MCFRS control.)

Customizing the Start Menu

Windows 10 allows you to customize and make the Start menu your own.

Customizing tiles is easy:

  • Click and drag tiles to rearrange them on your Start menu
  • Right-click tile to unpin the tile from the Start menu altogether
  • Drag a tile all the way to the bottom of the menu, it’ll create a new category, which you can rename

You can change the size of the tile:

  • Right-click a tile to pick from four sizes—small, medium, wide, and large—each of which will show different amounts of information.

resize3

If you decide you don’t want a tile to show live info, but want to keep the shortcut, you can right-click it and choose “turn live tile off”.

To add a new tile:

  • Find the tile in the All Apps section
  • Choose Pin to Start

Personalizing Your Desktop

Windows 10 allows for the user to personalize and customize their desktop.

To access the Personalization settings:
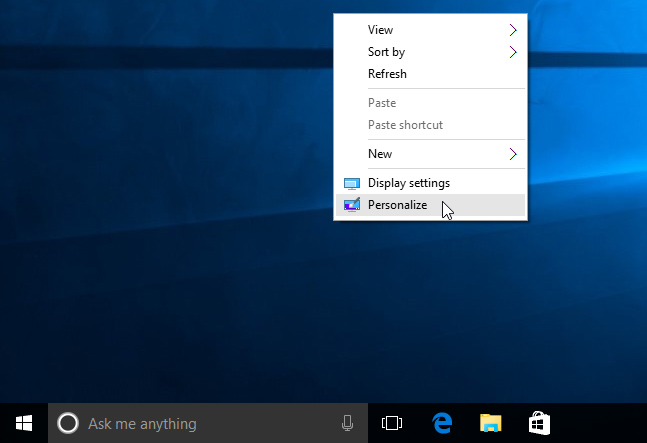
  • right-click anywhere on the desktop
  • select Personalize from the drop-down menu.
opening the Personalization settings
or
  • Click on Start menu
  • Choose Settings
  • Choose Personalization

personalize

In the Personalization menu, the user can change backgrounds, colors, themes, etc.


Utilizing Virtual Desktops

With Windows 10, the user can create an unlimited amount of Virtual Desktops.  Virtual Desktops allows the user to:

  • Group or organize multiple programs or group related windows
  • Locate and switch to any window or group of windows
  • Re-organize groups and move windows as tasks evolve
  • Control of the degree of separation between your grouped windows

The virtual desktops feature in Windows 10 is called Task View and is located on the Taskbar.  To add a virtual desktop:

  • Open up the new Task View pane by clicking the Task View button (two overlapping rectangles) on the taskbar,  TASKBAR
  • Click New desktop to add a virtual desktop.

or

  • Pressing the Windows Key + Tab

Windows_10

or

  • Press the Windows Key + Ctrl + D


Clicking the Task View button brings up the Task View interface, where you can see your open windows on virtual desktops you’ve added.


You can move programs among the different desktops you’ve set up.

To do so:

  • Switch to the desktop containing the program you want to move.
  • Click the Task View button on the Taskbar.
  • Right-click on the large thumbnail for the program you want to move
  • Select “Move to,” and then select the desktop number to which you want to move the program.

07_moving_a_program_to_another_desktop

The program now displays on the other desktop.