Setting up a New VPN Connection (County Laptop)

Have you been granted VPN rights, but now you don’t know the first thing to do? Here is your next course of action.

(Note: This presumes you’ll be using a county laptop to connect to the network, but won’t need to connect to a desktop in your office from that laptop.)

Set up Pulse Secure

  • Find and double-click MCG Software Center on your desktop. (This is only on county computers and you will not find this on your home computer.)
    Software Center Icon


  • Find and click to install Pulse Secure Client from the list. Go through the installation.
    Pulse Secure SW Center Icon


  • Run Pulse Secure. We now need to establish a connection (something you’ll do only once, as you will just use that saved connection after this point). The screen should show an empty list of connections and we’ll add one.
  • Click the plus (+) button in the Pulse Secure window to add a connection.
    Pulse Select Connections Header


  • Add the necessary info:
    • Type: (use the default Policy Secure or Pulse Secure).
    • Name: Call this whatever you would like. I recommend MCG or VPN.
    • Server URL: https://secure.montgomerycountymd.gov (unless DTS told you your server is secure2, in which case it would be secure2.montgomerycountymd.gov)
  • Click the Add button.

Connect to the VPN

  • Launch Pulse Secure (if you have not already).
  • Find the saved item for the county VPN and click the Connect button.
    County VPN Connection


  • Input your county single sign-on username and password (i.e., what you use to log into Windows in the office) when prompted and click the Connect button.
  • Wait for the connection to be made successfully. You will know it was successful if you see the green check mark next to the name of the saved connection.VPN Connection Successful


Disconnect from the VPN

  • Click the Disconnect button in the Pulse window when you are finished with county servers and want to disconnect.


Taking a Substitute Holiday

If a county holiday falls on your regular day off, you need to take another day off (using holiday lave, not your annual/sick/comp leave) within the same pay period.

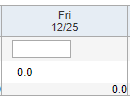
Scenario: Christmas Day (12/25) falls on a Friday and the employee works every other Friday in his normal schedule. 12/25 happens to coincide with that regular day off. The total number of hours in the preloaded MCtime timecard shows zero (0.0) hours on 12/25.

MCtime Date Showing Zero Hours for the Holiday

  • Add a row.
  • Change the Pay Code from Hours Worked to Hol – Holiday Leave.
  • Put in the number of hours for a full work day in the date of your choice (again, it must be in the same pay period). This applies whether you work 8, 9 or 10 hours on your regular schedule.
  • Delete the preloaded number of hours worked for the date you have chosen.
  • Save your timecard.

MCtime Holiday Hours Swapped to Another Day

Do you want to see more? Here is a link for the official documentation on this topic from the county MCtime office.

Adding a Resource Mailbox in Outlook Desktop

Were you recently granted access to a resource mailbox in Outlook? Are you using Outlook Desktop? If both are true, this message is for you.

  • Open Outlook Desktop.
  • Find and right-click your name in the folder list on the left side of the screen.
  • Choose Data File Properties.
  • Click the Advanced button.
  • Click the Advanced tab.
  • Click the Add button.
  • Type the name of your resource mailbox and then click the three successive OK buttons.
  • Find the new mailbox in your folder list. (As an outline, it will be even with your name, but likely pretty far down the pane.)
  • See if you can expand the item (using the > symbol). If you cannot, your rights need to be adjusted at the server level.

Resetting Your FireApp Password

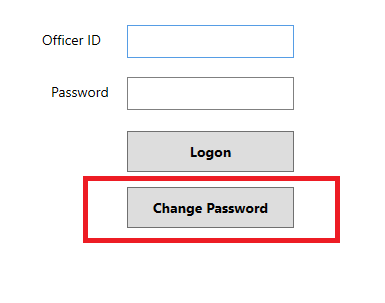
Users may use the Change Password button from the login screen to reset your FireApp password.

  • Input your FDID in the Officer ID field.
  • Click the Change Password button.

FireApp Change Password Button


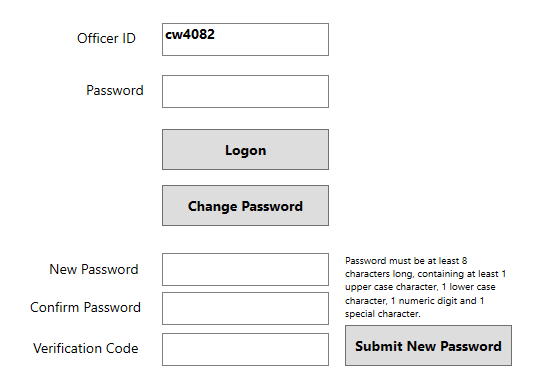
You will then receive a temporary PIN (sent to the e-mail address on file with FireApp). Input the code along with your new password (and confirmation second entry of that password).

FireApp Change Password Screen


Click the Submit New Password button and you’re ready to log into FireApp.

Saving Data in a PDF Form

Have you filled out a PDF, only to find that it wasn’t there when you tried to save the form? Did you save a form of data and believe it to be fine, but then e-mail it and the recipient(s) said that no data was there?

Next time, don’t choose Save when you are finished. Instead, choose to print and then name the PDF writer as the printer.

Print Dialog Box in a Browser


The user will be prompted for a filename and location. The data will be saved with the form and then viewable by the people who need to see the form after you send it.

Filling out SeamlessDocs Forms (Basic Tips)

BrowserGoogle Chrome is preferred and the company won’t guarantee everything will work smoothly with other browsers (e.g., Edge, Firefox, Internet Explorer and Safari). 

How to Attach FileYou have two choices for any form which requests attachments. 

  • Attach the file(s) while filling out the form by clicking the attachment(s) icon, which resembles a paperclip and is located on the far-left side of the screen.

Attach Button


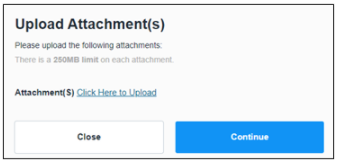
  • Wait until you sign and you’ll be prompted when you click the Submit button. To attach a file, you would like the Click Here to Upload link. You are limited to 250 MB per attachment.

Attach Dialog Box


Required Fields: Any required field is marked with a red asterisk, typical of required fields on virtually any web form on the Internet. If the form is asking for information and you would not normally need to provide it when filling out the given form, simply mark the field N/A. (Note: N/A is not an appropriate substitute when you should know the information and simply have not found the information before beginning your form.)

E-Mail Notifications: Due to the SeamlessDocs software programming, you may get more than one status notification, depending upon the form you have signed. Likewise, they may end up going to your Spam/Junk folder, so keep an eye on that.

Reducing the File Size of a PDF Using Adobe Acrobat

Do you need to drop the file size on your PDF? Do you have the full version of Adobe Acrobat? If so, this post is for you.

Open your PDF in Acrobat.

Click the Tools menu and select Optimize.

Acrobat Optimize Button


Note the new toolbar that appears, which includes the following two buttons:

Acrobat Optimize Buttons


Click the Reduce File Size button.

Identify a saving location and go through the save process as it appears on-screen.

Note: The Advanced Optimization button (as seen above) features six screens of options. Try to use the basic Reduce File Size button, to see if it meets your file size needs, before diving into these options.