Outlook

Reserving an FRS Conference Room at PSHQ

Need to reserve a conference room at headquarters? The process is simple, but please note that certain rooms are restricted and this process is not for those rooms. The list below only shows the rooms which are not restricted. (Note: There is a small sign posted inside each conference room near the door with the Outlook name of the room, for your convenience.)

  • Start a meeting request in Outlook.
  • List out the names/addresses of the individuals you would like to add.
  • Include the name of the conference room in the Required section, along with the names.
    • &PSHQ.FRS Atrium Shared (Atrium)
    • &PSHQ.FRS Fiscal Mgt Conf (Fiscal Services)
    • &PSHQ.FRS OPS Conf Rm (Operations)
    • &PSHQ.FRSVolSvcsConf (Volunteer Services)
  • Send the meeting request.


Changing or Removing Your Microsoft Program Avatar

Are you looking for a way to remove the picture you have as your Microsoft avatar? Are you currently represented as your favorite sports team logo, cartoon character or hand gesture to express your frustration because you can’t figure out whether Bingo was the name of the farmer or the dog?

The ideal way to fix this and follow county guidelines is through the Teams app (which should load on any county computer once you have signed in). If Teams doesn’t come up on your computer, just search for it with the other programs.

  • Find and click your avatar at the top-right corner of the screen.
  • Click your picture in the resulting box.
  • Click Remove to have just your initials appear in place of your pic or click Upload to replace with a pic of yourself.

Note: You can only change the pic in Outlook Web, not remove it entirely. You can only remove it via the Teams app.

If you are stuck and just can’t get this to work, please submit a TSR.

Changing Your Mail Options for an Outlook Group

Have you joined (or been forcibly assigned to) an Outlook Group? By default, you may automatically be receiving any and all e-mail sent to the group address. However, you have some options and may limit how much of the mail you receive. Even if you choose not to receive any, it will always be available in the group inbox for you to see when you so choose.

Outlook Desktop Directions:

  • Open Outlook Desktop.
  • Scroll to the bottom of the inbox folder list and click once on the Outlook Group for which you need to change the mail options.
  • Note the change to the ribbon  at the top of the screen. One of the items should be Group Settings.
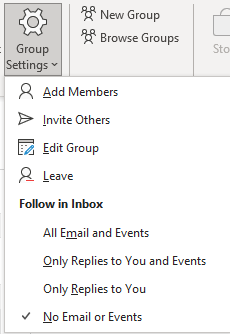
  • Click on the Group Settings button and note your options under the heading Follow in Inbox:
    Outlook Group E-Mail Settings
  • Choose No Email or Events if you do not want to receive any of the e-mail in your own inbox. Choose a different options as you see fit.

Outlook Web Directions:

  • Open Outlook Web.
  • Scroll to the bottom of the inbox folder list and click once on the Outlook Group for which you need to change the mail options.
  • Note the screen is now in three columns. In the middle column, you should see the name of the group. In the example below, the group name is _FRS_Defect_Pictures.
    Outlook Group OWA Screen 1
  • Click the ellipsis () found on the same row as Send email and choose Settings from the pop-up list.
  • Note the new panel that has appeared on the right side of the screen.
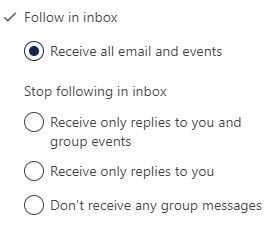
    Outlook Group OWA Settings
  • Choose No Email or Events if you do not want to receive any of the e-mail in your own inbox. Choose a different options as you see fit.
  • Click the X at the top of the Group Settings panel to close it (or just click elsewhere on the screen to close the panel).

Marking a Sender as Safe in Outlook Web (OWA)

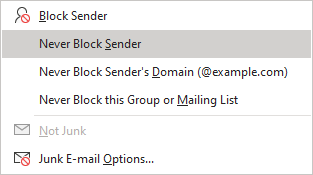
Do you get an e-mail message from someone and see that it has been going to Spam/Junk? Would you prefer to have it stay in your inbox? We need to mark the sender as safe. While there are multiple ways, here is one:

  • Find the message from someone you would like to mark as safe.
  • Find the e-mail address in the message preview and drag your mouse over it to select the full address.
  • Copy the address (or write it down with pen and paper for later recall).
  • Find and click the Settings button, located at the top-right corner of the screen.

    Outlook Settings Cog

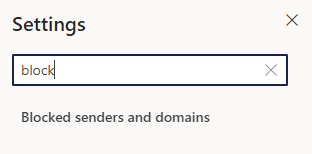
  • Type the word block in the settings input box and then click the Blocked Senders and Domains search result that appears.

    OWA Junk Block Search

  • Find the section called Safe Senders and Domains and click the + Add button. An input box will appear.
  • Paste the address you copied earlier (or type it manually, if you simply wrote it down).
  • Press the Enter key on your keyboard.
  • Click the Save button at the bottom-right corner of the window.

Using a Token or Fob for Multi-Factor Authentication

Have you opted to use a token or fob for multi-factor authentication? Assuming you already have filled out the tech service request (TSR) and have been notified by your battalion chief that it is ready for you, here are the instructions for use.

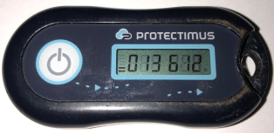
Background: A key fob is a small device that is about two inches in length and an inch wide. The device generates a password, which you will use in place of a text to your cell phone or message to your e-mail account for multi-factor authentication in Montgomery County systems. Remember, this key fob is assigned to you and will not work for anyone else’s account. Likewise, secure it and do not lose it, which would defeat the purpose of needing a second login code to keep others out of your accounts.

MFA Key Fob


Use:

  • Log into ePortal or Office 365. You will be promoted for a code.
  • Press the white button on the left side of the key fob and note the six-digit code that appears.
  • Enter the code into your MFA screen to be granted access.

    (Note: The code will be good for about 30 seconds before a new code is generated and displayed on the screen.)

Setting up your MCGOV E-Mail Account on Your iPhone

iPhone

  • Go to Settings and choose Mail.
  • Click Accounts.
  • Click Add Account.
  • Choose Microsoft Exchange and input your e-mail address where indicated.
  • Add MCGOV as the description and click the Next link (at the top-right corner).
  • Note that a pop-up will appear, asking if you want to configure manually or sign in directly. Choose Sign In.
  • Wait for the screen to verify your account and then you will see the MCG login screen.
  • Change the top line to your username from your email address. Your MCGOV username is your Windows username followed by @montgomerycountymd.gov. (For example, Michael Johnson’s username might be johnsm2@montgomerycountymd.gov.)
  • Input the MFA security code where prompted, which would have just been sent to you and ensure that the box is checked.
  • Click the Verify Code button.
  • Select which facets of Outlook you would like to include (Mail, Contacts, Calendars, Reminders and/or Notes).
  • Click the Save link at the top-right corner.


Adding a Resource Mailbox in Outlook Desktop

Were you recently granted access to a resource mailbox in Outlook? Are you using Outlook Desktop? If both are true, this message is for you.

  • Open Outlook Desktop.
  • Find and right-click your name in the folder list on the left side of the screen.
  • Choose Data File Properties.
  • Click the Advanced button.
  • Click the Advanced tab.
  • Click the Add button.
  • Type the name of your resource mailbox and then click the three successive OK buttons.
  • Find the new mailbox in your folder list. (As an outline, it will be even with your name, but likely pretty far down the pane.)
  • See if you can expand the item (using the > symbol). If you cannot, your rights need to be adjusted at the server level.

Setting up Rules in Outlook Desktop

Getting flooded with messages that you don’t want and all have a common theme (from the same person, the same subject, etc.)? Outlook enables you to set up a rule to clean it all up in one fell swoop.

  • Right-click one of the messages.
  • Select Rules and then Create Rules.
  • Click Advanced Options in the dialog box that pops up. The advanced options will give you more control with your rule than just the few options first presented.
  • Choose a condition, such as the subject containing certain text. (Since you right-clicked a specific message, the sender and subject should appear in the options from which you’ll choose.)
  • Click the Next button.
  • Choose what you want to do with the message, such as delete it. (If you just want to file the messages away and read them at a later time, choose to move the message into a folder.) Click the Next button to continue.
  • Add any exceptions (although this is rare).
  • Specify a name for the rule. This takes the theory that you may have several rules as time goes by and naming a rule with something obvious means you won’t need to go into the rule details to determine why you created it in the first place.
  • Click the Run this rule now on messages already in the inbox checkbox. This is crucial for cleanup when you have been plagued by a lot of messages for which you are writing a rule.