Marking a Sender as Safe in Outlook Web (OWA)

Do you get an e-mail message from someone and see that it has been going to Spam/Junk? Would you prefer to have it stay in your inbox? We need to mark the sender as safe. While there are multiple ways, here is one:

  • Find the message from someone you would like to mark as safe.
  • Find the e-mail address in the message preview and drag your mouse over it to select the full address.
  • Copy the address (or write it down with pen and paper for later recall).
  • Find and click the Settings button, located at the top-right corner of the screen.

    Outlook Settings Cog

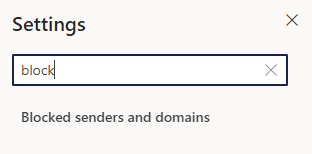
  • Type the word block in the settings input box and then click the Blocked Senders and Domains search result that appears.

    OWA Junk Block Search

  • Find the section called Safe Senders and Domains and click the + Add button. An input box will appear.
  • Paste the address you copied earlier (or type it manually, if you simply wrote it down).
  • Press the Enter key on your keyboard.
  • Click the Save button at the bottom-right corner of the window.

Reacting to Failsoft on the 800 MHz Radio

When the 800 MHz radio system has major computer problems, but stops just short of completely breaking, we enter what is called Failsoft mode.

How to know you’re in Failsoft mode:

  • Failsoft appears on your radio’s screen.
  • You will hear a regular chirp seconds.
  • ECC will announce that we are in Failsoft.

What happens?

  • All of our talkgroups reduce to a handful of channels. Those frequencies are shared and no longer parsed into separate talkgroups.
  • EB is no longer functioning.
  • No radio patches are available. (Note: This includes EMRC.)

What should you do?

  • Refrain from talking on the radio unless you have something vital to say.
  • Turn off the Scan feature.
  • Treat Failsoft like Condition Red.

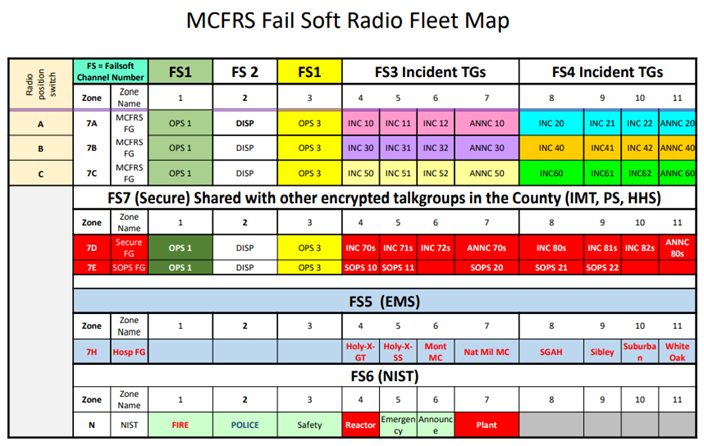
Here is the Failsoft fleetmap:

Failsoft Fleetmap

Using Software Center to Add Software to Your PC

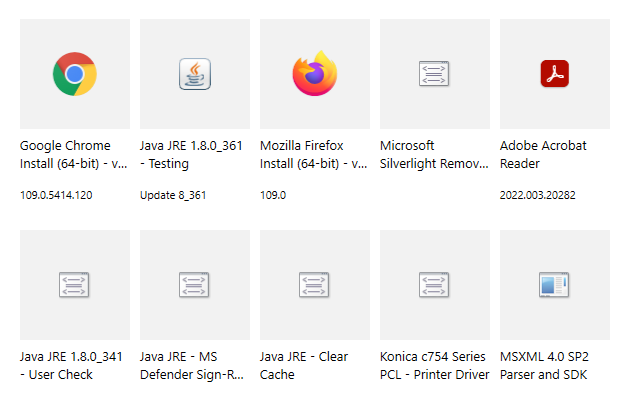
Did TEBS recently remove some software from your county PC, such as a browser? Software such as Chrome and Firefox must be loaded from a specific county location, instead of just a standard web download, so that it meets county specifications.

  • Ensure you are on the county network. If you are someone who teleworks, make sure you have logged into the network via VPN. If you are using a laptop in a county worksite, ensure that you are connected behind the firewall (as opposed to MCGuest).
  • Locate MCG Software Center on your desktop. If it is not a shortcut on your desktop, click the Windows start key on your keyboard and then type software. You will see search results for the Software Center app. Run it.
    Software Center App
  • Note the list of apps in Software Center. Here is an example:
    SW Center Menu
  • Find and click the app you would like to install.
  • Click the Install button. you will know that the installation has finished when the black button is labeled Reinstall.

Troubleshooting the SeamlessDocs Recruit Class Background Application Form

Are you filling out the SeamlessDocs Recruit Class Background Application Form and having some difficulty? Here are answers to some questions we have received in the past:

  • Issue: My background questionnaire isn’t sending and it’s giving me red incomplete flags.
    • Response: A red flag tells you that you missed a field, somewhere in the document.
  • Issue: When I click submit and sign, it tells me I need to select an option on page 49. I don’t see a page 49 or any red boxes to fill in. Therefore it’s not letting me continue to submit and sign.
    • Response: The form was created from an imported document, so the page numbering doesn’t necessarily line up to SeamlessDocs identifying a particular page (although it will be close). It the system is telling you that you missed a selection, you missed a selection.
  • Issue: Can the questionnaire be handwritten then uploaded as a pdf?
    • Response: No, the questionnaire must be typed.
  • Issue: I forgot to add something in my responses. May I add the info / attachment then resubmit my questionnaire?
    • Response: If information was omitted on a questionnaire that has already been submitted, candidates should type up the additional information and bring it with them if/when they meet with an investigator. They should not submit additional questionnaires.
  • Issue: How do I know if my questionnaire & documentation was submitted properly / received by FRS?
    • Response: You will receive e-mail automatically from the system.
  • Issue: I am trying to save the questionnaire so I can fill it out, but it won’t save.
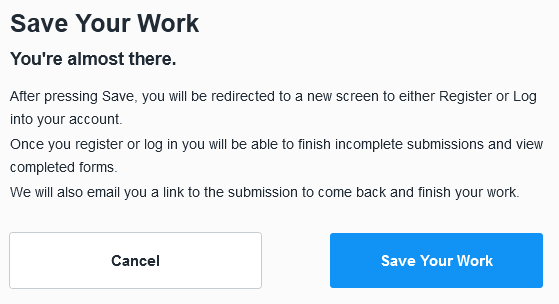
    • Response: If you have not created an account so that you may save, click the save icon. thereafter, you will see a pop-up dialog box.
      SD Save Dialog
    • Click the Save Your Work button and you will see the login screen (for those who have accounts). You will find the register Now button on the right side of that screen.
      SD Register Now Button
    • Fill in the prompts to create an account for use as you need to work on (and save) your background form.
  • Issue: May I still submit my questionnaire if I am missing one of the required documents?
    • Response: You will need to submit document(s) in lieu of the missing document(s). Create a placeholder document that includes your name and an explanation as to why the document is missing (e.g., I lost my social security card, but have requested a new one) and/or upload a copy of the receipt/confirmation that the missing document(s) has been ordered. Bring the original documents if/when you meet with an investigator.
  • Issue: I created an account to save my background form and then exited the form. I am trying to get back to it now. How do I do that?

Getting Started with a New County Account

Were you just assigned a new MCG account? The following TechTips/links may help you:

If you have any questions or need troubleshooting, please submit a Technology Service Request (TSR) and someone from FRS Technology will contact you.

Adding an Alternate E-Mail Address or Cell Number for MFA

Do you prefer not to use your MFA key fob when you need to access county e-mail or ePortal? You may opt to use a personal e-mail address or cell number to receive a multi-factor authentication code.

  • Log into ePortal.
  • Hover over the words AccessMCG Self-Service, located at the top-right corner of the screen.
    AccessMCG Menu Link
  • Choose Manage Account.
  • Log into ePortal again, as prompted.
  • Find and click Setup Alternate Phone/Email/App Contacts.
    MFA Option to Add E-Mail or Phone
  • Input an MFA code, if you receive one to an existing (pre-setup) location.
  • Add your personal e-mail address and/or cell phone number. When you add one, click the Save button and input the code that is sent to that location, to finalize the connection between ePortal and the account/device.
  • Click the Continue button.
  • Click the Logout link at the bottom of the list of links.

Recording Stand-by Hours and Hours Worked

Are you in a stand-by rotation, earning stand-by pay, and wondering how to record it in MCtime? There are two different statuses to consider:

  • Stand-by: When you are available to work (outside of your normal shift) within the on-call period. For this status, add a row and change the Pay Code to Stand By Pay. Enter the number of hours outside of your normal schedule that you did not perform any work in response to calls.
  • OT: When you do the work (outside of your normal shift) within the stand-by period. For this status, add a row and keep the Pay Code as Hours Worked, but add the proper Reason Code for your group (see list below). Enter the number of hours/partial hours you worked in response to a call.

Civilian Scenario A – Stand-by with No Response Needed:
You were on stand-by (Facilities, IT and/or CMF mechanic) all day Sunday and then the morning of Monday, prior to your work day. You did not need to perform any work in response to a call.

Civilian Scenario B – Stand-by with 1.5 Hours of Response Work:
You were on stand-by (Facilities, IT and/or CMF mechanic) all day Sunday and then the morning of Monday, prior to your work day. You responded to calls and worked 1.5 hours on Sunday.

Uniformed Scenario A – Stand-by with No Response Needed:
You are a day worker, assigned to PSHQ and you were on stand-by (Facilities and/or PIO) Monday evening. You did not need to perform any work in response to a call.
Standby MCtime C

Uniformed Scenario B – Stand-by with 4.5 Hours of Response Work:
You are a day worker, assigned to PSHQ and you were on stand-by (Facilities and/or PIO) Monday evening. You responded to calls and worked 0.75 hours on Thursday evening.
Standby MCtime D

GroupStandby Reason CodeWord Reason Code
CMF MechanicsFRS072SBFRS072MR
FacilitiesFRS073SBFRS073AH
ITFRS071SBFRS071IT
PIOFRS077SBFRS077PI

Notes:

  • Only one person in your group may be in stand-by status at any particular time.
  • You may not be in regular work status and stand-by simultaneously.
  • You may not have more than 24 hours in one day, so remember to subtract any actual hours worked manually from the standby hours.

If you need clarification on stand-by or on-call statuses, please see the MCGO Union Contract (Sections 5.7 and 5.20).
Using the Union Tool in Visio

Drawing structures on maps may seem daunting but the Union tool makes it very easy.  You are able to draw structures using a series of overlapping shapes and use the Union tool to merge the shapes together leaving just the perimeter outline.

Note: No matter what angle your structure will appear on your final map, it is much easier to draw it square and then simply rotate it to the actual angle.  Similarly, it is much easier to draw the structure larger than necessary and then resize it to fit your final map.

Complete the following steps to draw your structure:

  • Click on Shapes.
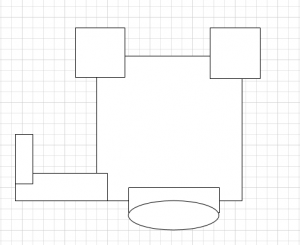
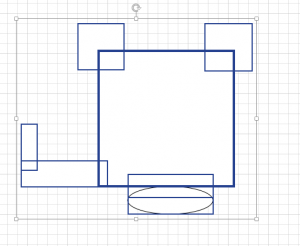
  • Use the shapes tools to draw a series of overlapping shapes to create the perimeter of the building.  In this example, it is a donut style apartment building with bump outs on Side Charlie and an overhanging portico on Side Alpha.  There is also a loading dock walled off on Side Bravo.


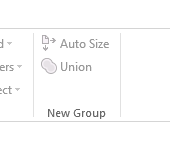
  • Highlight all the shapes and click on Union.


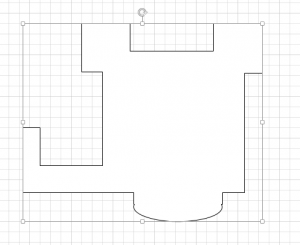
All of the highlighted shapes have merged and you now have the perimeter outline of your building.

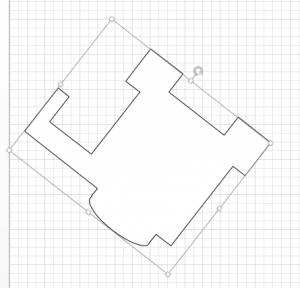
You are able to adjust the angle or size of the building by completing the following these steps:

  • Use the rotate symbol at the top of the drawing to change the angle of the building.
  • Use the section handles (the small circles in the corners, sides, or top/bottom) to resize the building.


Assigning Items to Layers in Visio

Layers are one of the best tools in Visio as they make editing so much easier.  If you add all of your items to different layers you can turn them on and off.  For example, if all your streets are on a layer named “streets” you can turn that layer off in order to print off blank street maps to conduct street drills.  If you have all your structures from a map page on the same layer you can turn off  the other layers except the structures layer in order to edit them all at once, such as increasing the weight of the lines of the buildings to make them stand out more.

Anything copied from GIS maps will come with its own layer assigned.  If you create anything of your own you will need to either add it to an existing layer or create a new layer to assign it . To do so, follow these steps.

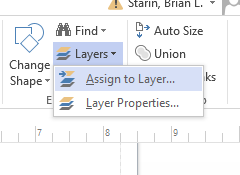
  • Click the item you wish to add to a layer (a hydrant for example) Click, on Layers then click on Assign to Layer in the dropdown menu.

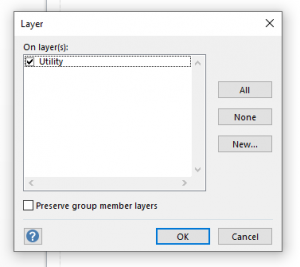
  • Check the box next to the layer if it already exists.

Each first due has features unique to that area.  There may be times the layer you want does not exist.  If you need to create a layer, complete the following step:

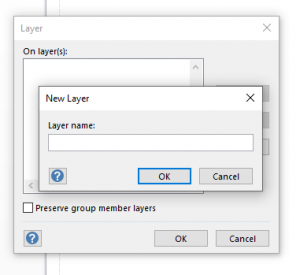
  • Click on New. A new window will pop up prompting you to provide a name for the layer. The item is now assigned to that layer.

Note: If you are doing hydrants for example, there will be several on a page.  You can either assign the first one to a layer and then copy and paste it over and over to get the number of hydrants you need or assign it to a layer and then add it to your station stencil (see tech tip on creating stencils) drag and drop from the stencil.