Author: Jeff Feiertag

Transferring Your Patient Report from Unit to Unit (within MCFRS)

Scenario: You have begun a patient report and you need to transfer it to another MCFRS unit for someone else to complete the report.

Begin your patient report and, when you are ready to transfer it, click the blue Transfers button, located at the top of the screen near the CAD and EKG buttons.
Elite Transfer Report Button


Note the pop-up menu that appears and select Upload Transfer.

Elite Transfer Type Button


Select Current Agency from the drop-down list and then select which option you need from the resulting pop-up dialog box. Transfer and Remove will send the report to the server for the other unit and remove it from your dashboard, whereas Transfer and Keep will send it to the server but leave the report on your dashboard.

Elite Transfer Options


Your will now be prompted whether to Post and Transfer or just Transfer Only. Select the former if you would like to post the report along with the transfer to the server or the latter if you just want to transfer the report to another unit.

Elite Transfer Post Options


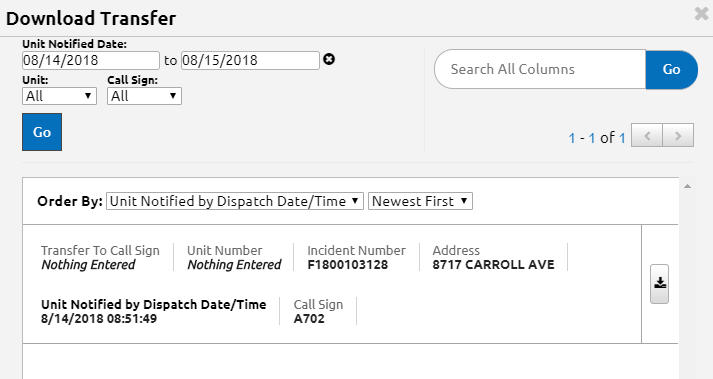
The other unit should click begin a blank incident and then click the Transfer button, followed by Download Transfer and will see the following dialog box:

Elite Transfer Download Dialog Box


The user may click the download button, found to the right of the desired incident (appearing as a down arrow) and continue the report as needed.

Authorizing for HIPAA and Billing for a Patient

Scenario: You have a patient who is not capable of signing his/her patient report.

Referring to your Required Signature Matrix (available as a PDF on the ePCR Toughbook!), you’ll see that you need four signatures and one is from the patient for HIPAA Release and Authorization for Billing.

How can a patient who is not capable of signing actually sign the report, then? (S)he cannot. The signature, then, falls on you to do with the status of Not Signed (Reason). Why does this make sense? Does this mean you are accepting responsibility for billing?

The short answer is no.

The longer answer, courtesy of EMS-Ops, is this: This is all done under implied consent.  The authorization to treat and release for billing can be completed by the provider when the patient cannot offer informed consent, based on the patient’s medical needs.  It is the same authorization we get to do the actual treatment and share patient information with the hospital.

Adding a Second Set of LifePak Data

Scenario: An AFRA does an EKG and a set of vitals on a patient, and then turns the patient over to an ALS transport unit for the transport (and the rest of the patient report) Each set of data from the two LifePaks may be uploaded and then both pay be imported into the same patient report.

  • Import the first data set from MCELITE into the patient report.
  • Import the second data set from MCELITE into the patient report.

The most important part of the that, for the person importing the data, is to look at the name of the LifePak/Unit in MCELITE before downloading.

Knowing the Difference between Closed Call and Non-Closed Call Rules

There are two types of validation rules:

  • Closed Call Rules — You may not post the patient report without filling in these fields. Note the circle with a slash on the right side of the validation rule.
    Elite Validation Rule


  • Non-Closed Call Rules — You may post the patient report without filling in these fields (but ask yourself if the quality of the report is suffering without the data before you post). Note that there is no circle with a slash on this one.
    Elite Validation Rule


Note: Of course, you should be adding all relevant details from the call into your report (required or not). Please refer back to your training about report-writing and narratives for proper technique.

Choosing the Right Selection in Elite When Your Hospital (or FROMS) Isn’t Listed

Scenario: The rookie on your shift hurt himself doing something too embarrassing to note here. It’s not serious enough of an injury to go to the hospital but you are taking him to FROMS. FROMS isn’t listed along with the hospitals in Elite.

The destination name you should choose is Other Facility – 888. The same applies if you are going to any hospital not listed. Please remember to provide the extra detail in your narrative.

Elite Destination Name Field

Enabling Visio to Open FRS Stencils (Shapes)

Visio 2013, be default, will block the FRS Stencils/Shapes (which include gas, electric, connections, north arrow and more) since they were created in much older versions of the program. Follow these steps to tell Visio they are acceptable files to open. (Note: This must be done within the profile of anyone who logs in to use Visio for mapping, not just once per computer.)

  • Run Visio.
  • Click Blank Drawing and click the Create button.
  • Access the File tab and click Options at the bottom of the left-hand navigation.
  • Click Trust Center at the bottom of the left-hand navigation on the pop-up window.
  • Click the Trust Center Settings button on the right side of the pop-up window.
  • Click File Block Settings on the left side navigation.
  • Uncheck the boxes for all three rows. (A checked box means Visio should block it, not unblock it.)
  • Click the two OK buttons.

Noting the Different Response Dispatches for PICs on Limited Access Highways (Such as I-270 and I-495)

Thanks to a new upgrade in CAD, response dispatches for PICs on limited access highways (such as I-270 and I-495) are different and more user-friendly. The alt-lane dummy unit is a thing of the past and in its place will be an alternate lane marker that follows the units assigned to the alternate (opposite) assignment, such as A703 (ALT). This will be seen on the CAD and MDCs.

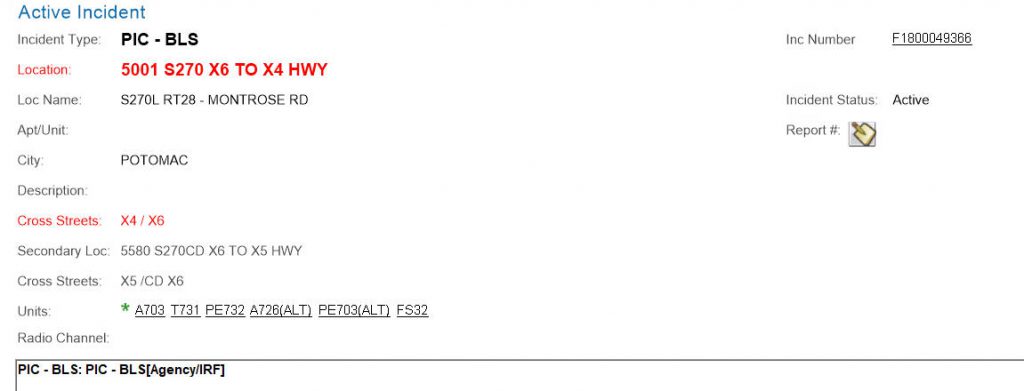
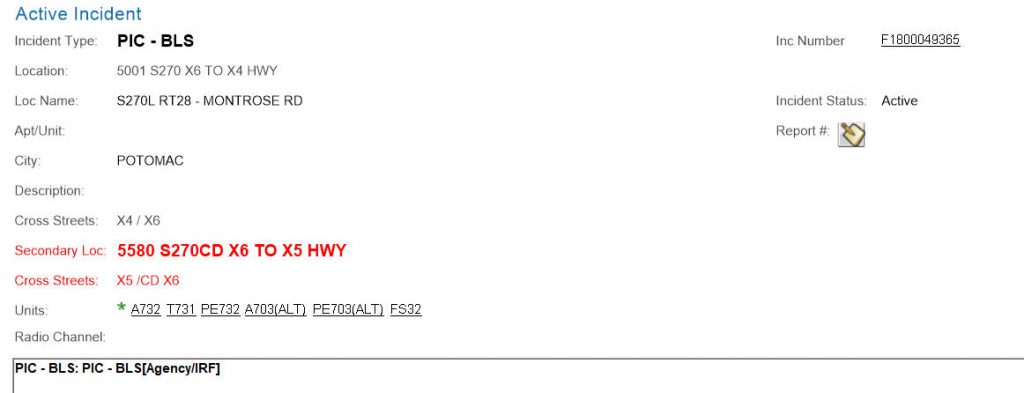
Moving forward, we have two different dispatches for units; you’ll just receive one but which one will determine where you should go. To reiterate: Just go where you’re dispatched (which is the text in red).

Scenario: There’s been a PIC on southbound 270 between 28 and Montrose Road.

The primary unit(s) will see this:

MDC Screen


The alternate unit(s) will see this:

MDC Screen


Also: 270’s commonplace names have been updated to include express lanes and local lanes (to match highway signage).

Fixing Your Browser to Run Hydrant/System Reports

Trying to run the Hydrant/System reports from Quicklinks but your browser isn’t cooperating? Similar to the fix for MCtime, try this:

  • Expand the Operations Division menu on Quicklinks.
  • Click Hydrant/System Reports and bypass the county pop-up warning or wait for it to close automatically.
  • Note whether the reports window loads properly or fails. If the latter, proceed with the following:
  • Click the Settings Gear icon in the upper-right corner (or press Alt-T on your keyboard to access the Tools menu in Internet Explorer).
    IE Settings Gear Icon


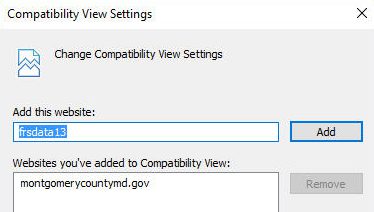
  • Choose Compatibility View Settings from the list.
  • Note that frsdata13 should appear in the top box; this is the name of the report server.
  • Click the Add button. The name of the report server should move to the lower box, where it will either be alone or join montgomerycountymd.gov, the necessary addition to run MCtime.
  • Click the Close button and the report window should load properly.

    IE Compatibility View Settings Dialog Box