P1 MDC

Finding a Caller’s Phone Number to Get More Information

Scenario: You have been dispatched on a call and need more information from the caller. Did you know that you may bypass ECC and just call the individual yourself, using the apparatus Sonim phone?

  • Find the incident on the incident screen if you are not already seeing the incident summary.
  • Click the Persons tab, located in the vertical navigation on the left side of the screen.
    P1 MDC Persons Tab
  • Click the + symbol next to the person’s name.
    P1 MDC Caller's Name
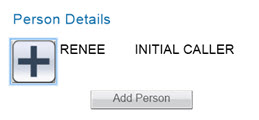
  • Find the caller’s phone number on the right side of the screen, if available.

Avoiding Losing Your MDC Touchpad

With a common keystroke mistake, MDC users (with the Panasonic FZ-55) are disabling their touchpads while trying to lower screen brightness. If this happens to you, press the FN and ESC keys.

  • Fn-Esc is a toggle to turn off and on the touchpad.
  • Fn-F1 reduces the brightness.
  • Fn-F2 increases the brightness.

There is no way for MCFRS IT to disable the Fn-Esc toggle, so you are advised to try this keystroke if you suddenly lose your touchpad capabilities.

MDC Esc and F1 keys

Disabling the Tools Pane Permanently in Adobe Reader

Are you trying to open a pre-plan PDF on your MDC and Adobe Reader insists on taking up the right side of the screen with an extra pane? Here’s a tip to turn it off permanently so you have more space for your PDF.

  • Hide the Tools pane, as you normally would.
  • Access the Edit menu and select Preferences.
  • Click the Documents side-tab, and then check the box for Remember Current State of Tools Pane.
  • Click the OK button.


Filtering Out Priority 9 Calls

Want to filter out Priority 9 calls from the MDC screen? Try this:

  • Click the My Incident button in the top navigation.
  • Click Monitor in the left-hand navigation.
  • Click Filtered in the left-hand navigation and then the Filter button at the bottom of the screen.
  • Click the Status Monitor drop-down field arrow and select Monitor.
  • Click the box for Priority.
  • Click in the Operators field and select Less than.
  • Type in a Value of 9 (or check the box for 9, either is fine).
  • Click the Add button.
  • Click the Filter button.
  • Refresh the list whenever you need by clicking the Monitor button in the left-side navigation and then the Filtered button beneath it.

Noting the Different Response Dispatches for PICs on Limited Access Highways (Such as I-270 and I-495)

Thanks to a new upgrade in CAD, response dispatches for PICs on limited access highways (such as I-270 and I-495) are different and more user-friendly. The alt-lane dummy unit is a thing of the past and in its place will be an alternate lane marker that follows the units assigned to the alternate (opposite) assignment, such as A703 (ALT). This will be seen on the CAD and MDCs.

Moving forward, we have two different dispatches for units; you’ll just receive one but which one will determine where you should go. To reiterate: Just go where you’re dispatched (which is the text in red).

Scenario: There’s been a PIC on southbound 270 between 28 and Montrose Road.

The primary unit(s) will see this:

MDC Screen


The alternate unit(s) will see this:

MDC Screen


Also: 270’s commonplace names have been updated to include express lanes and local lanes (to match highway signage).

Viewing Only Certain Priority Incidents on the P1 Incidents List

The P1 MDC Incidents list can be long. Suppose you want to see only the incidents of priority 4 and lower (as the list goes up to priority nine).

  • Click the Incident button on the right side of the screen.
  • Click the Filter button at the bottom of the screen.
  • Check the Priority box.
  • Set the Operator as Less than or Equal to and input a Value of 4.
  • Click the Add button and then the Filter button.

Note: The filtered list you created is a snapshot and will not update the main list.

Sending a Message to ECC via P1 MDC

Need to contact someone at ECC while you are on an incident? No need to remember any workstations or who’s who with P1 MDC!

  • Go to the Mail feature, click the New button at the bottom of the screen and choose Message.
  • Click the To button to select a message recipient.
  • Choose My Dispatcher, which should be located at the top of the list.
  • Click the right arrow/triangle button to address the message to My Dispatcher.
  • Click the OK button.
  • Fill in the message as needed and click the Send button at the bottom of the screen.

Note from the ECC leadership: The My Dispatcher address goes to all at ECC.  For our own procedures, we do not want messages targeting individuals, as was the standard in the previous CAD.

Finding a Preplan When Not on an Incident

Preplans are listed in the premise/hazards section. If we’re not talking about a building related to a particular incident, you can use the Prem/Haz feature to search by whatever location/address you like. (If it is while on an incident, just click the Prem/Haz button the left side of the screen when you have the individual incident loaded in front of you).

  • Click the Prem/Haz button on the right side of the screen.
  • Key in the address and click the Verify button.
  • Change the agency from F to All (which includes C and F – I believe that preplans are related to C, which stands for Communications or ECC).
  • Double-tap the preplan when it comes up in the resulting list.