2007

Marking a Message as Not Clutter

If you would like to keep a message from being marked as clutter in Outlook, either right click on the message and choose Mark as not clutter or just drag it to the Inbox. If Office 365 is missing messages you want marked as clutter, right click and choose Mark as clutter or drag it to the Clutter folder.

If you are using Outlook 2007, 2010 or 2013 (Desktop), simply drag a message to the Clutter folder to mark it as clutter or drag it to the Inbox to mark it not clutter.

By dragging messages to the Clutter folder you will train the tool to spot similar e-mail in the future. The tool gets smarter over time, learning from your prior actions with similar messages.
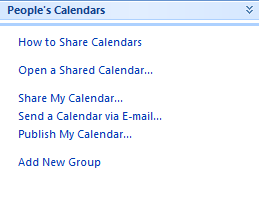
Adding the Apparatus Calendar to Outlook 2007

  • Switch to the calendar view.
  • Find and click the link to Open a Shared Calendar.

    Outlook 2007 - Calendar Other

  • Note the popup window that requests the name of the calendar to open.

    Outlook 2007 - Shared Calendar

  • Click in the box to place your cursor and type &FRS.ApparatusMovement.
  • Click the OK button. Note that the calendar opens but it may take a few minutes to import all of the data on this first time.
  • Use the calendar as you need.
  • Find the All Calendar Items section again and you’ll see the apparatus calendar with a checkbox next to it.

    Outlook 2007 - Calendar Selected

  • Uncheck the calendar when you don’t want to see the data on your screen. (For some people, it can be in the way of their own calendars.)

Handle an Attachment

When you receive an attachment for an Office document in these months before we all move to Office 365 (i.e., Word, Excel, PowerPoint), you have two options:

  • Edit the document in 365
  • Edit the document in your locally installed software (e.g., Word 2003 or Word 3007)

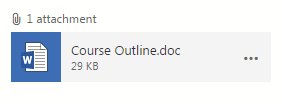
Here’s what the attachment looks like in Outlook 365:


O365_attachment

To edit in 365, simply double-click the document.

To edit in 2003 or 2007, you’ll need to download the document (save it to your computer) and then open it. To do so:

  • Click once on the elipses (…) to the right of the attachment.
  • Choose Download.
  • Wait for the document to finish downloading, as seen in the lower left corner of the screen.
  • Click once on the downloaded document.

To send the downloaded and edited document to someone (or back to the  original sender), you’ll need to save the file somewhere on your computer and then attach it to an e-mail message.

MS PowerPoint Window

PowerPoint 2003 Location PowerPoint 2007 Location
New WindowView | Window | New Window
Arrange AllView | Window | Arrange All
CascadeView | Window | Cascade
Next PaneOffice Button | PowerPoint Options | Customize | All Commands | Next Pane
Window NamesView | Window | Switch Windows | Window Names
More WindowsView | Window | Switch Windows | More Windows

MS PowerPoint View

PowerPoint 2003 Location PowerPoint 2007 Location
NormalView | Presentation Views | Normal
Slide SorterView | Presentation Views | Slide Sorter
Slide ShowView | Presentation Views | Slide Show
Notes PageView | Presentation Views | Notes Page
Master | Slide MasterView | Presentation Views | Slide Master
Master | Handout MasterView | Presentation Views | Handout Master
Master | Notes MasterView | Presentation Views | Notes Master
Color/GrayscaleView | Color/Grayscale
Task PaneDialog launchers in some groups will launch a Task Pane instead of a dialog. E.g. Home | Clipboard | Dialog Launcher
RulerView | Show/Hide | Ruler
Grid and GuidesHome | Drawing | Arrange | Align | Grid Settings
Header and FooterInsert | Text | Header & Footer
ZoomView | Zoom | Zoom

MS PowerPoint Tables and Borders

PowerPoint 2003 Location PowerPoint 2007 Location
Draw TableInsert | Tables | Table | Draw Table
EraserTable Tools | Design | Draw Borders | Eraser
Border StyleTable Tools | Design | Draw Borders | Pen Style
Border WidthTable Tools | Design | Draw Borders | Pen Weight
Border ColorTable Tools | Design | Draw Borders | Pen Color
BordersTable Tools | Design | Draw Borders
Fill ColorTable Tools | Design | Table Styles | Shading
Table | Insert TableInsert | Tables | Table | Insert Table
Table | Insert Columns to the LeftTable Tools | Layout | Rows & Columns | Insert Left
Table | Insert Columns to the RightTable Tools | Layout | Rows & Columns | Insert Right
Table | Insert Rows AboveTable Tools | Layout | Rows & Columns | Insert Above
Table | Insert Rows BelowTable Tools | Layout | Rows & Columns | Insert Below
Table | Delete ColumnsTable Tools | Layout | Rows & Columns | Delete |
Delete Columns
Table | Delete RowsTable Tools | Layout | Rows & Columns | Delete | Delete Rows
Table | Merge CellsTable Tools | Layout | Merge | Merge Cells
Table | Split CellTable Tools | Layout | Merge | Split Cells
Table | Borders and FillTable Tools | Design | Table Styles
Table | Borders and FillOffice Button | PowerPoint Options | Customize | All Commands | Borders and Shading
Table | Select TableTable Tools | Layout | Table | Select | Select Table
Table | Select ColumnTable Tools | Layout | Table | Select | Select Column
Table | Select RowTable Tools | Layout | Table | Select | Select Row
Merge CellsTable Tools | Layout | Merge | Merge Cells
Split CellTable Tools | Layout | Merge | Split Cells
Align TopTable Tools | Layout | Alignment | Align Top
Center VerticallyTable Tools | Layout | Alignment | Center Vertically
Align BottomTable Tools | Layout | Alignment | Align Bottom
Distribute Rows EvenlyTable Tools | Layout | Cell Size | Distribute Rows
Distribute Columns EvenlyTable Tools | Layout | Cell Size | Distribute Columns
Change Text DirectionTable Tools | Layout | Alignment | Text Direction
Set Left-to-Right TableTable Tools | Layout | Alignment | Set Left-to-Right Table
Set Right-to-Left TableTable Tools | Layout | Alignment | Set Right-to-Left Table

MS PowerPoint Standard

PowerPoint 2003 Location PowerPoint 2007 Location
SpellingReview | Proofing | Spelling
CutHome | Clipboard | Cut
CopyHome | Clipboard | Copy
PasteHome | Clipboard | Paste
Format PainterHome | Clipboard | Format Painter
UndoQuick Access Toolbar | Undo
RedoQuick Access Toolbar | Redo
ChartInsert | Illustrations | Chart
Insert TableInsert | Tables | Table | Insert Table
Tables and Borders ToolbarYou can find these commands under the Table Tools contextual tab that appears when you insert or select a table.
HyperlinkInsert | Links | Hyperlink
Show FormattingOffice Button | PowerPoint Options | Customize | All Commands |
Show Text Formatting
Show/Hide GridView | Show/Hide | Gridlines
ZoomView | Zoom | Zoom
Font ColorHome | Font | Font Color
FindHome | Editing | Find

MS PowerPoint Slideshow

PowerPoint 2003 Location PowerPoint 2007 Location
View ShowView | Presentation Views | Slide Show
Set Up ShowSlide Show | Set Up | Set Up Slide Show
Rehearse TimingsSlide Show | Set Up | Rehearse Timings
Record NarrationSlide Show | Set Up | Record Narration
Action ButtonsInsert | Shapes
Action SettingsInsert | Links | Action
Animation SchemesAnimations | Animations | Animate
Custom AnimationAnimations | Animations | Custom Animation
Slide TransitionAnimations | Transition To This Slide
Hide SlideSlide Show | Set Up | Hide Slide
Custom ShowsSlide Show | Start Slide Show | Custom Slide Show

MS PowerPoint Slide Master View

PowerPoint 2003 Location PowerPoint 2007 Location
New SlideSlide Master | Edit Master | New Slide Master
Delete SlideSlide Master | Edit Master | Delete
Rename MasterSlide Master | Edit Master | Rename
Slide LayoutSlide Master | Master Layout | Master Layout
Close Master ViewHandout Master | Close | Close