Effective spring 2024, MCFRS is using a new Jotform process for submitting and approving PARs. Here is the documentation.
Administrative Procedure
Setting up OneDrive for Network Scans
Do you have documents you need to scan, but you don’t want to send them one by one to your e-mail account? OneDrive will let you set things up so that you may scan on the big county copier/scanners and then send the files directly to your OneDrive account.
- Open a browser and input the following URL in the address bar, but replace username with your county SSO username:
https://mcgov-my.sharepoint.com/personal/username_montgomerycountymd_gov/_layouts/15/mngsiteadmin.aspx - Click in the box next to your name and type to search for svc-od4b_scan.
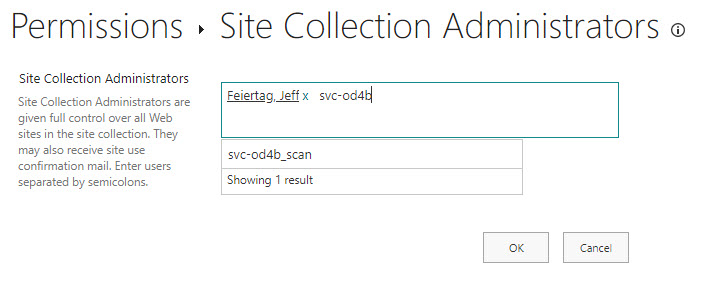
- Click to select on the search result (svc-od4b_scan) and click the OK button.
- Use the Ricoh to scan your document(s).
Getting Started with a New County Account
Were you just assigned a new MCG account? The following TechTips/links may help you:
- Changing your network password
- Setting up multi-factor authentication with a personal e-mail address and/or cell phone
- Choosing where (and where not) to send an MFA code
- Using an MFA key fob
- Unlocking Your Network Account
If you have any questions or need troubleshooting, please submit a Technology Service Request (TSR) and someone from FRS Technology will contact you.
Requesting to Record a Video Meeting
In an email to Montgomery County department heads dated April 1, 2022, the Chief Administrative Officer provided direction that we must limit use of the recording features in our online meeting systems (Teams, Google, Zoom) to only those selected personnel who need to record:
- Formal trainings intended for large audiences
- Public meetings, where there is no expectation/obligation of privacy and meeting is open to public
As such the MCFRS will use the following process for obtaining authorization for recording meetings for a specific window of time.
Form Submitter’s Role:
- Submit a Tech Service Request (TSR) and choose Meeting Video Recording Request for the category. In the auto-generated e-mail reply, you will see a link for the Meeting Video Recording Request Form. Click that link.
- Fill in the form. Some notes on the form:
- Choose Other as your rank if your rank is below battalion chief (career), if you are not an LFRD chief (volunteer) or if you are not an M3 (civilian)
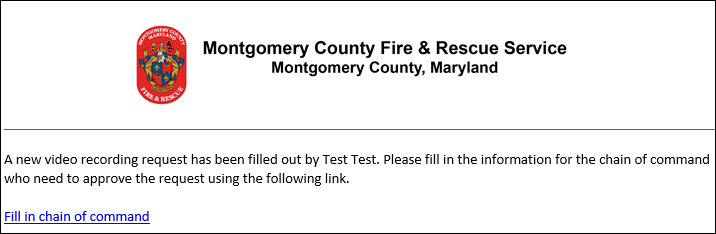
- Ensure that you have no typos when you input your supervisor’s e-mail address. That individual will receive e-mail that requests for chain-of-command information.
- Note that, for the purposes of this form, the chain of command among the LFRD will be from the person submitting the form, to the LFRD chief and then to Division Chief Mike Kelley.
- Select the appropriate video technology you plan to use (Google Meet, Teams or Zoom).
- Identify the start and stop dates for recording capability.
- Read the paragraphs of fine print very closely, as they are important. By submitting the form, you agree to them.
- Supply the specific reason you are recording the event in the text box provided.
Supervisor’s Role:
Preface: If you are an AC, DC or LFRD Chief, please skip to the Approver’s Role section below.
- Receive the e-mail and click the link to fill in chain of command, if applicable.
- Fill in the necessary information.
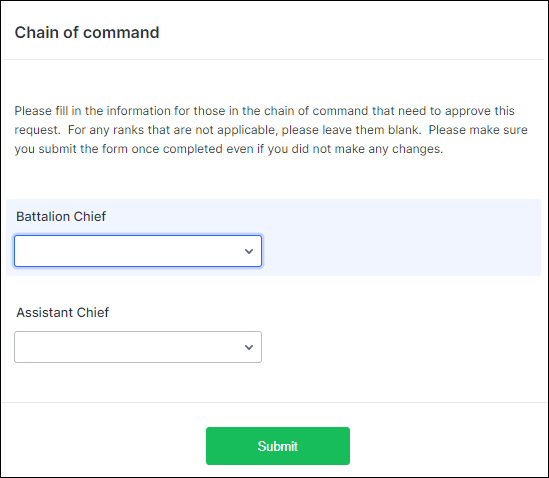
- Click the Submit button.
- Receive the e-mail message and approve/deny as needed. Approval will move the request up the chain of command.
Approver’s Role:
- Receive the e-mail and review the request details.
- Click the Approve or Deny button and wait for the form to load in your web browser.
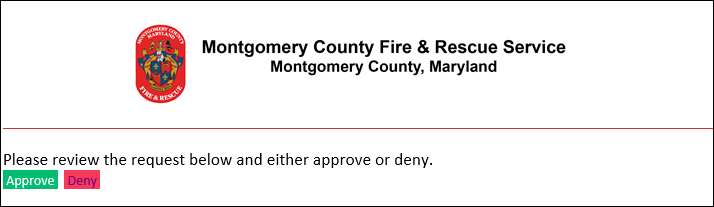
- Change your response, if needed, and then (for approve or deny) provide the reason why you are approving or denying the request.

- Click the Complete button.Note: The form will then trigger e-mail to the next level in the chain of command. This process will continue through the division chief’s approval or denial of the recording request. The MCFRS IT Web Coordinator will then activate the recording capability (Google Meet and Teams) or request TEBS to activate the capability (Teams) and follow up with the requestor.
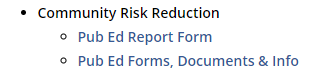
Finding the Pub Ed Report Form (Wufoo)
As of July 2019, the MCFRS public education section (now called Community Risk Reduction) has moved from the Vol and Community Ed Services Division to the Office of the Fire Chief. With that move, the links for public education documentation and Wufoo form have moved on Quicklinks. Here are directions to find the new location.
Go to Quicklinks.
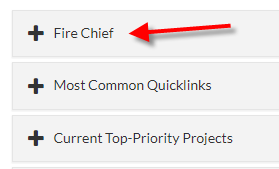
Click to expand the Fire Chief menu and choose Pub Ed Report Form.
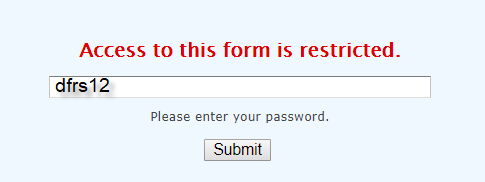
Enter the password (as shown below) and click the Submit button.
Use the form.
Checking Off Personnel in a Tech Training Subsite
Scenario: You are a career officer or LFRD training coordinator and need to check off some of your personnel in a tech training subsite for the training project of the month. (Note: Only some of the subsites offer this capability; some check-offs are based upon the individual completing a course on his/her own.) Examples include Alzheimer’s training and IRP-Spec Ops (technical rescue and water rescue).
Logging in
Go to the site, either by direct link (as provided in an FCGO or direct e-mail message from the Ops chief, for example) or via the tech training website chief section (lower-right corner of the chief main page – see the bullet list).
- Click the Officers’ Check-Off navigation item instead of the Chiefs navigation item and you will be asked to log in. Please enter your tech training website login username and password. (Note: If you are asked again to enter the username and password — and you are positive you did not have a typo — then please contact Jeff Feiertag to have your security rights checked.)
Navigating to the Correct Check-Off Page
- Click the link for which personnel you would like to check off for completion of training, career or volunteer. (Note: In the rare circumstance you are checking off any civilian administrative personnel, they will be found in the volunteer section, listed as MCFRS Admin.)
- Select the name of the course for which you would like to provide credit to your personnel. If you are on the career check-off page, please also select the battalion and shift. (Personnel not located in Battalions 1-5 are assigned to Battalion 99.) if you are on the volunteer check-off page, select the LFRD.
- Click the checkbox next to any name you would like to provide credit. Repeat as needed until all of the personnel in that battalion/shift or LFRD for which you want to provide credit have check marks.
- Scroll to the bottom of the page.
- Ensure the date is correct. (It should load the current date but you may change it to reflect the proper date in which your personnel earned credit, if needed.)
- Click the Check Off Students button.
- Repeat for any other battalion/shift combinations or LFRDs.
- Remember to log off of the site when you have finished by clicking the Logout link, located toward the top-left of the page.
Starting a New IPPA Document without the Default Read-Only Limitation
Several officers have found that the IPPA documents found on Quicklinks are saved as read-only and then they have difficulty using (and editing) the documents. Here is your workaround:
- Go to Quicklinks, expand the Human Resources Division menu and click the IPPA Forms and Documents link (or just click it here).
- Find the rank-level evaluation you need on the right side of the page.
- Click the link to download the file (likely saved to your Downloads folder). Alternatively, you may right-click the link and select (Save As…) to save the file in a specific place of your choice.
- Go to the location of the saved document and double-click to open the document. Note the pop-up:

- Click the No button to indicate you don’t want the document to be read-only.
Note: Some versions of Word will also prompt you with an Edit Document button near the top of the screen in the View tab. If you see that, click it.
Resetting Your Fleet Management/Defect Reporting Password
Need a PW reset for Fleet Management/Defect Reporting? Call or e-mail the county helpdesk (240.777.2828 / helpit@montgomerycountymd.gov).
Using the Lobby-Level Conference Room Projector at PSHQ
MCP has updated the audio/visual setup in the PSHQ main conference room. Below is some information you may want.
Misc. Notes:
- There is only one microphone in the room by default and it is located on the podium at the front of the room. If you know you will need more microphones, please contact Larry Kees (Larry.Kees@montgomerycountymd.gov), the POL Telecom Specialist. Please give him several days of lead time with your request.
Setting Up Your Laptop/Notebook
- Place your laptop or notebook computer on the podium at the front of the room. Note the cords attached to the podium:
- Blue cable: Network access
- USB cable: Audio from your computer to the white speakers on the wall flanking the projector screen
- HDMI cable: Video from your computer to the projector
- Plug all three cords into your computer.
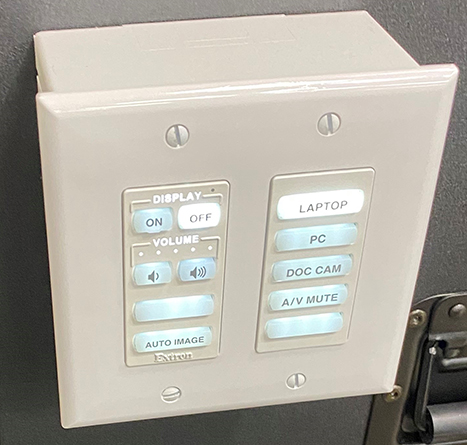
Using the A/V Control Box
- Press the On button at the top-left corner of the A/V control box and ensure that the Laptop button is backlit, as well. When both buttons are backlit and your computer is on, the image from your computer should show on the screen.
- Adjust the volume to the white speakers by pressing the two volume buttons.
- Ignore all of the other buttons.