DOC Log

Adding Seats in the Line-Up Module of the DOC Log

This TechTip is for DOCs and personnel assigned to the DOC office.

  • Search for the unit on which you need to add seats.
  • Click the Edit link for the unit.
  • Add the new seat’s information in the row of empty fields at the bottom of the list, consistent with the other entries. (Note: The riding position may contain three character strings, such as E734 DR E1, all sensible within your experience.)
  • Ensure that the battalion is correct for the whole unit. If the battalion number changed (related to the glitch described above) then you would need to edit and update each seat on the unit.

Finding and Repairing a Unit on the Line-Up Module of the DOC Log

This TechTip is for DOCs and personnel assignmed to the DOC office.

Due to a system glitch, a unit will default automatically to Battalion One anytime someone makes an admin-level change to its record (i.e., the same process used when adding a unit). Those who do not pay attention to changes resulting from this glitch may be unable to find the unit in their battalions (other than the B1 personnel, of course). IT personnel are aware of the glitch and are working to resolve it.

  • Click the Assignment Lookup link in the blue header.

    Assignment Lookup Button

  • Choose Portable Radio Assignments from the drop-down menu and click the View Records button.
  • Place your cursor in the Search Unit text box and type the name of the unit you need to find (e.g., E734). Note: The unit name is not case-sensitive.
  • Click the Search Unit button.
  • Make any necessary changes. The most common change comes as a result of the glitch which causes the battalion number to change (as described above).
  • Click the Update link on the far-right side of the row.

Adding Units to the Battalion Line-Up Module of the DOC Log

As a DOC or other admin assignmed to the DOC office, you will occasionally need to add units to the DOC Log.

  • Click the Assignment Lookup link in the blue header.
  • Choose Portable Radio Assignments from the drop-down menu and click the View Records
  • Scroll to the bottom of the resulting list. You will see a row of empty fields.
  • Fill in the data for a position on the unit you are adding, consistent with the others in the list.
  • Use N/A for the two radio ID fields unless a radio is permanently assigned to the riding position.
  • Remember to check the box on the right side of the row to cause the riding position (and unit, if it’s the first riding position you have added for the unit) to display on the DOC Log.
  • Repeat as needed for other riding positions.

Saving and Printing the Line-Up Module of the DOC Log

You have saving printing capabilities, important in case the network goes down. As to whether you print or not is your decision; the file will go into an Excel spreadsheet for you. On screen, the file looks fine but printing may be difficult since the data does not fit smoothly on one page (even with column size changes and margin tweaks).

If you are going to print, you should not attempt to print through the web browser; go through Excel. Printing or not, Excel gives you other advantages as well (such as using formatting to mark the ALS provider on a paramedic engine).

  • Find and click the Export to Excel button, located just to the right of the View Assignments button.

    View and Export Buttons


  • Wait for the file to download. If you are using Internet Explorer, you may be asked whether to Open or Save the file. The choice is up to you; if you open the document, the computer will launch Microsoft Excel for you and load the document. If you choose to save the document, you will need to identify a location (e.g., your Windows desktop) and then you’ll need to open the file in Excel.

    If you are using Chrome or Firefox, the file will download automatically (likely to the system’s default Downloads folder) and you will need to run the file or open it in Excel. If Windows prompts you to note that the file format and extension do not match, click Yes.

Note: If you would like basic Excel training to learn about formatting text, adjusting columns, changing page orientation and changing margins, please contact Jeff Feiertag by e-mail.
Changing Radios on Apparatus in the Line-Up Module of the DOC Log

As you need to identify you have swapped out a loaner radio for a portable radio (as noted in the instructions above), you will do that as you list personnel. Currently assigned spare portable radios (and their locations) are listed at the bottom of the screen.

  • Click on the unit link (as noted in the TechTip for Entering Personnel on Apparatus).
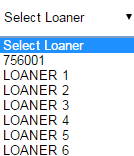
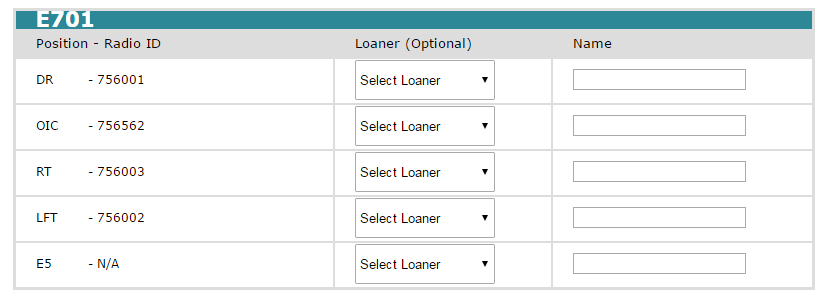
  • Click the Select Loaner drop-down arrow related to the position radio to be changed and choose the appropriate loaner radio. The current position’s radio ID will appear at the top of the list to be used when the radio is ready to go back in service.
    Apparatus Loaner Radio Selection
  • Click the Save and Close button.
  • Note that the radio ID has been updated for the riding position as well as in the footer.

Entering Personnel on Apparatus in the DOC Log Line-Up Module

Entering Personnel on Apparatus

  • Select your battalion and station from the related drop-down boxes.
  • Select or input the date and click the View Assignments button.

    View Assignments Button

  • Click the link for the first unit for which you need to list staff. (Note: You only need to be concerned with the apparatus being staffed.)

    DOC Log Unit Displayed

  • Note the radio ID for each position. If you need to swap out broken radios for loaners, you would do that here. Directions are below, though.
  • Fill in the last name of each person in his/her proper assignment. Please capitalize the first letter of the last name and type the rest of the name in lower case.
  • Click the Save and Close button. (Note: The names and radio IDs will appear for the unit. There will be also timestamp with your username in the blue header for the station, labeled Last Update By.)
  • Repeat as needed for each staffed unit.
  • Remember to log out when you have finished everything you need to do. The Log Out link is located on the right side of the dark blue header at the top.