Author: Jeff Feiertag

Clarifying the MCtime OT Changes for July 2015

Overtime

According to FCGO 15-09, cost center codes are no longer needed for overtime.

If you are used to pulling the transfer codes from your history (top of the transfer code search screen in HTML and in the transfer column drop-down list in Java), remember not to use one with the cost center and only use entries (once you have them in the list) that show reason codes. For example:

  • ////FRS060OF// = Officer Backfill in the Field
  • ////FRS060FF// = Firefighter Backfill in the Field

As a reminder, any grant-related OT must include all three transfer codes (project task, expenditure org and reason code).

Court (Detail vs. Overtime)

Approved court entries go two different directions:

  • Detail from your regular shift: Scheduling will put an entry into Telestaff. The following day, you will see Admin Leave – Court Appearance as a pay code. Do not add transfer codes.
  • Overtime: Keep the pay code as Hours Worked (like any typical overtime) but add the reason code FRS063TC (the same code we have used for years – not a new code).

Promotional Exam (Detail vs. Overtime)

Promotional exams also split two different ways:

  • Detail from your regular shift:  Admin Services will put an entry into Telestaff. The pay code will still be Hours Worked. Do not add any transfer codes.
  • Overtime: Keep the pay code as Hours Worked (like any typical overtime) but add the reason code FRS071PI (Promotional Exam – In-County) or FRS071PO (Promotional Exam – Out of County).These are also the same codes we have used for several years.
Accessing EMRC via Radio

Notes from MIEMSS for Calling EMRC:

  • The initial call from the EMS unit should be “EMRC, this is <Jurisdiction Name> <Unit Number>.”
    • Do not expect EMRC to recognize NCR County codes. Multiple jurisdictions have unit numbers
      that start with 7 and 8.
    • While not mandatory, it is helpful to state during the initial call whether the provider is utilizing a UHF radio (EMRC Med Radio) or 800 MHz radio.
  • EMRC will respond and advise whether to go ahead with your request or to stand by.
    • Please do not make any requests until the EMRC operator acknowledges your unit number.
  • After EMRC has advised to go ahead with your transmission, state your request:
    • State the receiving hospital and whether a physician-consult is needed.
    • Noting if a physician consult is required will ensure that the EMRC brings an authorized
      consulting base station on the line. Some facilities are not authorized to provide online medical
      direction.
  • EMRC will then direct you to a med channel for connection with the hospital.
  • Upon changing to the med channel acknowledge that you are on the med channel with your unit
    identifier: “<Jurisdiction Name> <Unit Number> online”.

    • This is important when using the conventional EMS radios. Your transmission is needed to steer
      the automated electronic system to the correct radio tower for your area.
  • 6. Once a hospital announces they are on line identify your unit and proceed with your request or report.
    • If you are unsure you have the correct hospital(s) online, have them confirm their facility name.

Some Additional Important Notes:

  • Remember, EMRC services many jurisdictions. The initial call should be brief.
  • Always use plain language and avoid abbreviations or codes.
  • State the full hospital name being requested.
  • Please be extra cautious with the following common miscommunications:
    • Howard University Hospital vs Howard County General Hospital
    • Washington Hospital Center vs both the Maryland-based Washington Adventist Hospital and Fort Washington Hospital.
    • EMRC is often confused when units request “PG Shock Trauma”. The operator may bring up
      BOTH Prince Georges Hospital Center (PGHC) and R Adams Cowley Shock Trauma Center.
      Refer to the PGHC Trauma Center as “Prince Georges Hospital Center”.
    • MEDSTAR Trauma Center vs Washington Hospital Center Adult Emergency Department. Like
      University of Maryland Hospital and Shock Trauma, these are two separate facilities with
      separate lines. Please either use “MEDSTAR Trauma” or “Washington Hospital Center”.
    • The Children’s facility at United Medical Center is a separate facility with its own consultation
      line. Please specify to EMRC that would like “Children’s at United Medical Center” or
      “Children’s at Southern Avenue”.
    • The Children’s facility at United Medical Center is not a recognized base station and cannot
      provide medical direction. Simultaneous consultation is required with both a physician from
      Children’s National Medical Center (CNMC) and the Children’s Facility at United Medical
      Center.
    • CNMC utilizes their own radio operator to patch consults. Once EMRC connects a unit to CNMC
      you will be required to communicate your request a second time to the CNMC radio operator.

Marking a Message as Not Clutter

If you would like to keep a message from being marked as clutter in Outlook, either right click on the message and choose Mark as not clutter or just drag it to the Inbox. If Office 365 is missing messages you want marked as clutter, right click and choose Mark as clutter or drag it to the Clutter folder.

If you are using Outlook 2007, 2010 or 2013 (Desktop), simply drag a message to the Clutter folder to mark it as clutter or drag it to the Inbox to mark it not clutter.

By dragging messages to the Clutter folder you will train the tool to spot similar e-mail in the future. The tool gets smarter over time, learning from your prior actions with similar messages.

Using the Lobby-Level Conference Room Projector at PSHQ

MCP has updated the audio/visual setup in the PSHQ main conference room. Below is some information you may want.

Misc. Notes:

  • There is only one microphone in the room by default and it is located on the podium at the front of the room. If you know you will need more microphones, please contact Larry Kees (Larry.Kees@montgomerycountymd.gov), the POL Telecom Specialist. Please give him several days of lead time with your request.

Setting Up Your Laptop/Notebook

  • Place your laptop or notebook computer on the podium at the front of the room. Note the cords attached to the podium:
    • Blue cable: Network access
    • USB cable: Audio from your computer to the white speakers on the wall flanking the projector screen
    • HDMI cable: Video from your computer to the projector
  • Plug all three cords into your computer.

Using the A/V Control Box

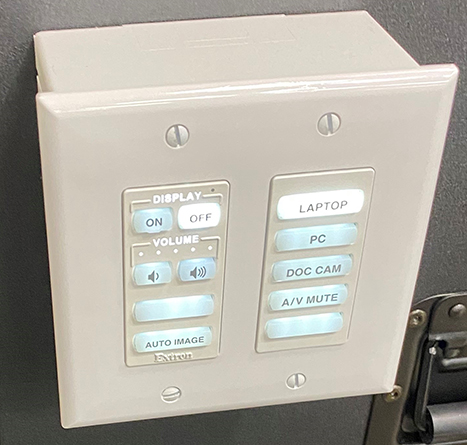
  • Press the On button at the top-left corner of the A/V control box and ensure that the Laptop button is backlit, as well. When both buttons are backlit and your computer is on, the image from your computer should show on the screen.
  • Adjust the volume to the white speakers by pressing the two volume buttons.
  • Ignore all of the other buttons.

PSHQ Conf Room A/V Box

Docking Your eMEDS Toughbook (Quick Version)

Seat the Feet

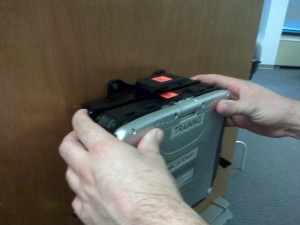
Align the feet of the docking station with the notches on the bottom of the Toughbook.

IMG00007

Match A to A

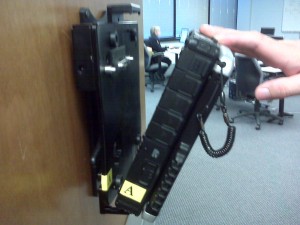
Ensure that the A sticker on the Toughbook is in the same place as the A sticker on the docking station (bottom left side).

Match B to B

Guide the top of the Toughbook to the top part of the docking station slowly to match the B stickers on the Toughbook and the docking station.

IMG00008

Reporting for a Unit that Fails to Repond

Is a Fire App Unit Report completed for a unit that fails to respond? And if so, how is that report competed? In short, it depends.

  • If ECC marked the unit as FFR and the unit did not respond (i.e., no enroute time), then FireApp will not create a unit report for it and therefore there is no need to complete a FireApp report.
  • If ECC marked the unit as FFR and the unit did respond (i.e., with enroute time) after being marked as FFR, FireApp will create a unit report for it and the unit officer will have to complete that report.
  • If the unit was in fact FFR, but ECC failed to mark it as FFR, then FireApp will not treat it as FFR unit and went ahead to create a unit report for it. In this case, the commander can notify FRS IT and we will check with ECC. Once ECC confirms it is FFR, FRS IT will remove the unit report from FireApp and adjust FFR statistics for Ops Chief office accordingly.

Changing the Resolution on Your eMEDS Toughbook

The toughbooks offer two resolutions for you to choose. 800×600 will show the buttons and drop-down menu items as larger; 1024×768 will show those items as slightly smaller but will give you more to see on the screen without having to scroll. Here is a video that shows you how to change the resolution.

Note: Someone else may have already changed your Toughbook’s resolution and you only have the two from which to choose. Many thanks to Jason Giza for providing the video.

Printing the Battalion Line-Up from the DOC Log

Want to print the exported spreadsheet from the battalion line-up module of the DOC Log? The spreadsheet doesn’t work very well with default settings and so you’ll need to tweak a few things. Try this:

  • Click the Page Layout tab at the top of the screen.
  • Click on Margins (in the Page Setup section).  At the bottom of the menu that appears, choose Custom Margins.
    Custom Margins Option in Ribbon
  • Change the settings to:  Left: 0, Right: 0, Top: .5 and Bottom: .5
  • In that same window, click Center on Page Horizontally.

    Excel Margins for DOC Log Line-Up

  • Click the OK button.
  • While still in Page Layout tab, set Width to 1 page  and set Height to 1 page (in the Scale to Fit section).

    Custom Width and Height

  • Click the View tab.
  • Select Page Break Preview (toward the left side of the ribbon).  If a dialog box appears, click Do Not Show Again and then OK.
  • You will see a blue margin line on the far right side of the document.  Drag that blue line to the left, all the way to the edge of the document where the blue shaded text box ends.
  • Execute the Print command.

Note: To return to the previous view so that you do not see Page 1 written across the spreadsheet, select Normal, which is located next to Page Break Preview on the Page Layout tab.

Once you successfully print the first one, to print the additional battalions for your road pack, follow a similar process:

  • Click the Page Layout tab and click Margins.
  • Select Last Custom Setting (the first item in the list).
  • Set Width to 1 page and Height each to 1 page while still in Page Layout, as you did earlier (above).
  • Click the View tab and select Page Break Preview . You will see a blue margin line on the far right side of the document.  Drag that blue line to the left, all the way to the edge of the document where the blue shaded text box ends.
  • Execute the Print command.