- Select the battalion, as you did upon logging onto the DOC Log Line-Up Module.
- Skip the station drop-down box.
- Choose the appropriate date and click the View Assignments button.
Author: Jeff Feiertag
Changing the Table Style in a Word Document
To Change the Table Style in a Word Document:
Word 2013 has a variety of different styles to use with the table in your document
- Place the cursor in any cell on your table that your would like to format.
- Choose Table Tools Design tab on your Ribbon. A display of different table styles will appear .
- Choose your desired table style from the choices to apply to your table.
Customizing Margins in a Word Document
To Create Custom Margins:
- Choose Page Layout tab on the Ribbon. Under Page Layout, choose Margins. A Margin Gallery will appear.
- Choose Custom Margins on bottom of the Margin Gallery. A Page Setup dialog box will appear.
- Use the spin arrows to increase/ decrease your margin settings for the top, bottom, left, and/or right margins of your document. You may also type your exact margin measurements in the box.
- Apply these measurements to the entire document or from this starting point.
- Choose OK to apply the margin settings to your document.
Changing Radios on Apparatus in the Line-Up Module of the DOC Log
As you need to identify you have swapped out a loaner radio for a portable radio (as noted in the instructions above), you will do that as you list personnel. Currently assigned spare portable radios (and their locations) are listed at the bottom of the screen.
- Click on the unit link (as noted in the TechTip for Entering Personnel on Apparatus).
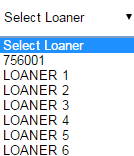
- Click the Select Loaner drop-down arrow related to the position radio to be changed and choose the appropriate loaner radio. The current position’s radio ID will appear at the top of the list to be used when the radio is ready to go back in service.
- Click the Save and Close button.
- Note that the radio ID has been updated for the riding position as well as in the footer.
Entering Personnel on Apparatus in the DOC Log Line-Up Module
Entering Personnel on Apparatus
- Select your battalion and station from the related drop-down boxes.
- Select or input the date and click the View Assignments button.
- Click the link for the first unit for which you need to list staff. (Note: You only need to be concerned with the apparatus being staffed.)
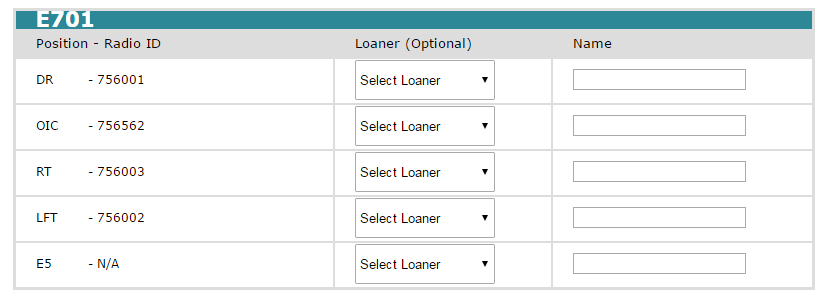
- Note the radio ID for each position. If you need to swap out broken radios for loaners, you would do that here. Directions are below, though.
- Fill in the last name of each person in his/her proper assignment. Please capitalize the first letter of the last name and type the rest of the name in lower case.
- Click the Save and Close button. (Note: The names and radio IDs will appear for the unit. There will be also timestamp with your username in the blue header for the station, labeled Last Update By.)
- Repeat as needed for each staffed unit.
- Remember to log out when you have finished everything you need to do. The Log Out link is located on the right side of the dark blue header at the top.
Adding Headers and Footers to a Word Document
To Add Headers and/or Footers:
- Choose the Insert tab on your Ribbon.
- Choose Header/ Footer option under the Insert tab. This will open a header/ footer gallery. Choose your desired header/ footer style from the gallery and apply to your Word document.
- The text in your document will become dim. The header/ footer area will appear with information prompts.
- Type text in header/ footer information prompts.
- Choose Close Header and Footer on your Ribbon.
You may want to omit the header and or footer from the first page of your document.
To Omit the Header/ Footer from the First Page of Your Document:
- Choose the Insert tab on your Ribbon
- Choose the Header/ Footer option under the Insert tab.
- Choose the Edit Header/ Edit Footer option.
- Choose Different First Page box in the Options group.
Inserting and Formatting a Table in a Word Document
To Insert and Format a Table:
- Determine where you would like to place the table in your document
- Choose the Insert tab on the Ribbon.
- Choose Table. This will display a Table Grid.
- Decide on the number of rows and columns you would like to have in your table. Your table will open in your Word document.
- A new tab Table Tools will now appear in your Ribbon
- Choose Table Tools tab to change the borders, border size, shading, etc. for your table.
Tracking and Reviewing Word 2013 Document Changes
To Turn on Tracking:
- Choose the Review tab on the Ribbon.
- Choose Track Changes to begin monitoring for edits/ changes made to the document.
- The user may now begin to edit the document. When edits/ changes are made to a document, a red vertical bar will display in the left margin next to the area where changes were made.
To Review Changes:
- Find a red vertical bar in the left margin and click on it. This will change the view of the document and any edits/ changes will now appear on the screen.
- Additions to the document are a different color text and underlined.
- Deletions to the document are a different color text with strikethrough formatting.
- Move the cursor to the beginning of the document.
- Find Track Changes under the Review tab on the Ribbon and choose Next. Choosing Next will highlight the first edit/ change made to the document.
- Decide whether to Accept the change to the document, or Reject the change to the document.
- Choosing to Accept the edits/ changes will automatically change the document.
- Choosing to Reject the edits/ changes will automatically revert the document back to its original state.
- Repeat the above step until you have reviewed all the edits/ changes made to the document.
You may decide that you would like to accept all edits/ changes made to the document
- Find Track Changes under the Review tab on the Ribbon.
- Click on the arrow below the Accept option and choose Accept All Changes.
If you would like to see who made each edit/ change to the document:
- Click on Track Changes under the Review tab on the Ribbon and choose Reviewing Pane. Reviewing Pane will display the types of edits made and the person who made the edit/ change.
When you are finished reviewing the edits/ changes to the document:
- Click on Track Changes under the Review tab to turn this feature off.
Setting Margins in a Word Document
Microsoft Word 2013 automatically creates a 1 inch margin. You can adjust these margins setting to fit your needs.
To Set Margins in Word:
- Place cursor anywhere in document
- Choose Page Layout tab on the Ribbon. Under Page Layout, choose Margins. A Margin Gallery will appear.
- Choose a margin setting, and Word will apply the new margin setting to your document.
Documenting a Patient Assist
Scenario: You are dispatched on a patient assist call. You arrive at the patient’s home and help him off the floor. Should you do a report?
From the EMS brass:
“While we’re still considering whether this should be a report, it’s a safer bet right now to assume you should do a report. When you arrive and inquire about the patient to the patient, you’re essentially starting an assessment. Also, if you help him up and then three days later he has pain, also saying he tried to tell you and you weren’t interested, it’s difficult for us to determine what happened or didn’t happen if there is not report.”
In short, it looks like you should do a report until/unless you hear otherwise from headquarters.