TechTips

Getting Rid of the News and Entertainment Posts in a New Edge Tab

Are you using Edge and finding that, when you start a new tab, you see all kinds of news and entertainment posts? Do you just want a basic search page, instead?

  • Open Edge.
  • Click the three dot button at the far right and choose Settings.
  • Click Start, Home and New Tabs on the left side of the screen.
  • Find the New Tab section at the bottom of the page.
  • Find the first item in that section, Customize your new tab page layout and content, and click the corresponding Customize button.
  • Note that your tab loads with all of the news and such.
  • Find and click the gear icon at the top-right corner of the page.
  • Click Focused.

Choosing the Right TSR Category

Trying to determine which TSR category fits your help request? Here is a handy guide to get you started. This post will be updated over time. As a reminder, TEBS has recently reorganized a number of key teams and as a result you are reminded that all IT requests should be routed through TSR and the MCFRS Technology Section.

CategoryWhat is Covers
Apparatus HeadsetApparatus Headset
Applications/Software - DataIssues with Logistics App, Personnel App, EMSQA, FF Time Tracking, WOC, etc.
Applications/Software - InstalledInstalled software not working correctly.
Applications/Software - Mobile AppsMobile apps for phones or tablets (Handtevy and PSTrax). NOTE: This does not include Active911 and MCEN.
Applications/Software - Web-BasedBatt Lineup, DOC Log, MCtime, PCAP, PIMS, SharePoint, WPM, etc.
Axon Body CameraAxon Body Camera
Axon Dash CameraAxon Dash Camera
Cable TV ServiceCable TV Service
CAD System & Hardware (Including CAD Mapping and ECC Phones)CAD (ECC and Field), CAD Mapping, ECC Phones, etc.
Data Systems & RequestsData Warehouse, data reports, data mining, response data report requests, etc.
Detectors/MetersDetectors/Gas Meters
Email ServicesOutlook accounts (existing and new requests), distribution lists, groups, etc.
Email Services - ALS OnlyE-mail issues related to ALS personnel
ePCR System & HardwareePCR/Elite system, software and hardware, etc.
Fire Station AlertingFire Station Alerting
Fire Station AudioFire Station Audio
FireApp (or other RMS Issues)FireApp server, software and hardware
FirstNet Subscriber PayFirstNet Subscriber Pay
GPS SystemsGPS Systems
Hardware/Software - License or Purchase RequestAll requests to buy hardware or software, including web-based product licenses (triggers an additional form for you to submit)
IT Exemption RequestRequest for an exemption to an existing FRS and/or TEBS policy (triggers an additional form for you to submit)
Meeting Video Recording RequestRequest to record a Teams, Google or Zoom meeting
Messaging (Active911, MCEN, CMsg)Active911 and MCEN account requests and issues with existing accounts
Mobile Data (MDC)MDC software and hardware
Multi-Factor Authentication (MFA)MFA conection problems, requests for key fobs (activate and deactivate)
Network Systems (Including network drives & VPN access)Network drives, connectivity problems, VPN (access issues and new account requests)
Phone Number UpdatesUpdate your desk or cell phone number in the centralized list
Radio Consoles (ECC)Radio Consoles (ECC)
Radio System InfrastructureRadio System Infrastructure
Radios and EquipmentPortable and mobile radios, speaker mics, DVRS issues, etc.
Station Video CamerasStation Video Cameras
Technology HardwareDesktop computer issues, peripherals (monitor, printer, webcam, etc.) and network printers
Technology Training Site & Tracking SubsitesSystem access, transcript problems, training data tracking, etc. for the main tech training website and all tech training project subsites
Telecomm Services & HardwareDesk phones, cell phones, SONIM phones, etc.
TeleStaff System & HardwareTeleStaff System & Hardware
Tone Alert PagersTone Alert Pagers
Web-Based FormsChanges to existing web forms (Jotform, SeamlessDocs, etc.), new form requests, access to forms
Website Changes & IssuesWebsite edit requests
WindowsWindows

Changing Your Tech Training Password

Can’t remember your tech training password and/or just want to change it? Here are the steps:

  • Go to the tech training website.
  • Find and click the Reset Password link, located near the top-right of the screen.
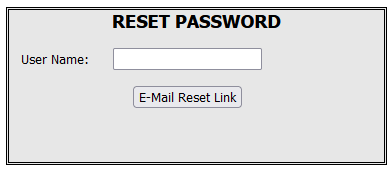
  • Note the box that appears:
    Password Reset Box 1
  • Input your username and click the E-Mail Reset Link button. A message will be sent to the e-mail address on file with your tech training website account. (If that e-mail address is no longer valid, please contact Jeff Feiertag (jeff.feiertag@montgomerycountymd.gov) to update the address.
  • Find the message in your e-mail account. (If you do not see it, please check your junk/spam folder).
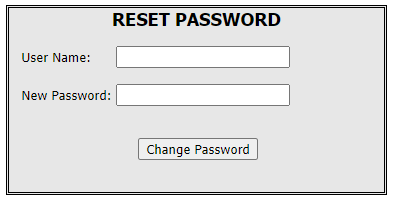
  • Click the link provided in the e-mail message. This will take you back to the website to show the following box:
    Password Reset Box 2
  • Input your username again, followed by the new password of your choice. Please use at least eight characters and the following:
    • At least one upper-case letter
    • At least one lower-case letter
    • At least one number
    • At least one special character
  • Click the Change Password button and verification will be sent to the same e-mail address on file.


Configuring Edge to Work in IE Mode for MCtime on Non-County PCs

Are you hoping to set up Edge at home, so that you may use it to work on timecards? It needs a few tweaks and FRS Technology has tried to simplify the process for you. (Note: Only someone who has administrator rights on a PC can perform this process successfully.)

  • Download the file Edge-IE.zip from the tech training website. Remember where you save it on your computer, such as the Windows desktop or the Downloads folder.
  • Find and double-click the file to open it in an unzip utility (such as 7-Zip or WinZip).
    Zip folder
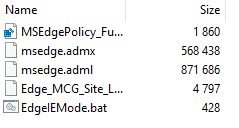
  • Double-Click the Edge-IE folder folder to expand it.
    Zip folder expanded
  • Press Ctrl-A on your keyboard to select all of the files.
  • Click the Extract button and either choose a new location or proceed with the default location to save the files (which will likely be the same location you selected earlier).
  • Close the zip utility.
  • Open a folder (through the File explorer or any other desktop folder) and go to the location where you just extracted your files.
  • Double-click the file called EdgeIEMode.bat.
  • Open Edge and access timecards as needed.

Troubleshooting MCtime’s “Failed to Validate Certificate” Error Message

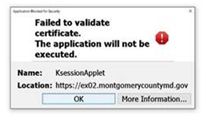
Are you an officer on a county computer and seeing a failed to validate certificate error message like the one below?

MCtime Failed Certificate Error Message

Try this fix:

  • Close your web browser (Internet Explorer or Edge).
  • Find the Windows flag at the bottom-left corner of the screen.
  • Type Java and press the Enter key on your keyboard.
  • Click Configure Java from the search results and the Java Control Panel options box will appear.
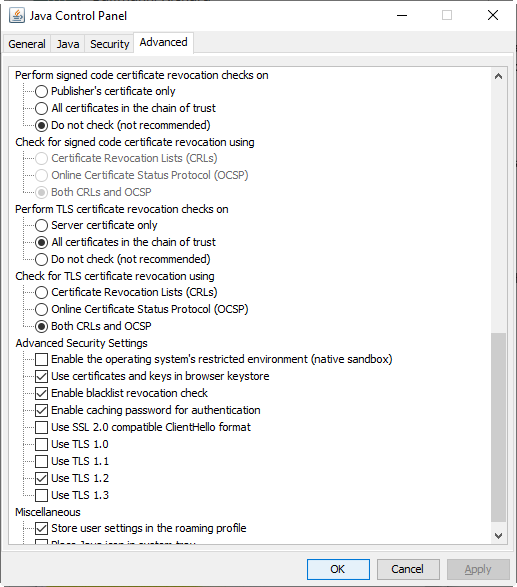
  • Change to the Advanced tab at the top of the window.
    Java Advanced Options Dialog Box
  • Scroll down until you see Perform signed code certificate revocation checks on in the list. It is halfway down the list, perhaps more.
  • Click to select Do not check (not recommended) and click the OK button at the bottom of the screen.
  • Open a folder on your Windows desktop (File Explorer or other folder) and click the View tab.Windows View Ribbon
  • Ensure that the Hidden Items checkbox is checked. If it is not, check it.
  • Navigate to the following location:
    C:\Users\[your username]\AppData\LocalLow\Sun\Java\Deployment
  • Find the file called deployment.properties.
  • Right-click it and choose Open (or Open With, if that is the option) from the list. You will likely be prompted as to which program should open the file. Choose Notepad and click the OK button. (If you do not see Notepad listed, click the MoreApps link to find Notepad.)
  • Find the line that reads deployment.security.mixcode=HIDE_RUN and place your cursor after the word RUN.
  • Press the Enter key to create a blank line.
  • type the following into the blank line:
    deployment.security.revocation.check=NO_CHECK
  • Do not make any other changes to the file!
  • Access the File menu and choose Save.
  • Close the deployment.properties file.
  • Start your browser and try to access MCtime.

If you are still stuck at that point, please fill out a Technology Service Request and FRS Technology will help you as quickly as we can.


Forwarding Your County Desk Phone Number to Your Cell Phone

Do you have a dedicated phone line at work, and would you like to be able to forward it to your cell phone?

To have this set up for you, please fill out a TSR.

  • Nature of Problem: Telecomm Services & Hardware
  • Comments: Please cite your name and Avaya desk phone number

The FRS telecom manager will need to have this capability enabled on the server. Thereafter, return to this TechTip and see below for forwarding instructions.

To turn on auto-forwarding, once it is available to you:

  • Dial *2, 9 and then the phone number to which you would like to send the calls. (Notes: If the area code is not 202, 240 or 301, you must include the number 1 before the area code.)
  • Examples:
    • For the number 240-555-1212, you would enter: *292405551212.
    • For the number 614-555-1212, you would enter: *2916145551212.

To turn off auto-forwarding:

  • Dial #2.

Final thoughts:

  • Turning the auto-forward on and off must be done from your desk phone.
  • The caller ID (on your second device) should show the number of the caller, not the phone number of your desk phone.
  • If you have any questions or concerns, please submit a TSR with the category Telecomm Services & Hardware.

Using Your Computer Instead of your County Avaya Phone While Teleworking

Are you a teleworking county employee and you would like to use your computer for your phone? Using a technology called Voice over IP (VoIP), we can set up your county computer with a program which you’ll run and use. You’ll only need a headset with microphone.

To have this set up for you, please fill out a TSR.

  • Nature of Problem: Telecomm Services & Hardware
  • Comments: Please cite your name, computer DCM number and Avaya desk phone number

Note: Someone from FRS Technology will coordinate a date/time with you for setup. You may need to bring your computer to meet that individual for the initial setup. You will simply log into the program whenever you are telecommuting. When you are logged out of the program, your desk phone will be active. If you do not have a headset with microphone, please include in the TSR that you would like one.

Choosing Where (and Where Not) to Send Your MFA Code for Office and ePortal

When you go to log into ePortal or Office, are you getting a code for multi-factor authentication (MFA) in too many places? Do you prefer to change where it’s going now?

Go to ePortal (either by direct link or via Quicklinks).

Click the My Account button and log in as directed. (Key in the MFA code you receive.)

My Account Button


Find and click Select Multi-Factor Authentication Options link in the list.

Select MFA Options Link


Key in the MFA code that the system sends you.

Check or uncheck boxes to set your preferences as to where you would like to receive MFA codes from the county and click the Save MFA Options button.

Save MFA Options button


Log out of ePortal when you are finished.

Troubleshooting MCtime Java/Manager Version

Note: These directions were updated on 03/29/2022.

As Java changes often present MCtime troubleshooting opportunities for managers, here is a guideline for you. Please remember that FRS Technology is always available and happy to help, though. If you would like assistance, please fill out a Tech Service Request (per FCGO 21-02) and select Applications/Software – Web Based for the Nature of Problem (category) field.

The list below is a progressive set of directions and you may need to check MCtime as you go along — what may resolve the issue for one computer may require more steps for another. Also, please remember to use Microsoft Edge. Again, to stress the point, let FRS Technology know if you would like assistance at any time.

Software Center (if there are Java-related items)

  • Locate and run MCG Software Center on your Windows desktop.
  • Install the latest version of Java (JRE) and User Check.

Software Center (if there are not Java-related items)

  • Follow these directions to update Software Center, to show Java-related items. (The directions should open in a new tab. return here when finished.)
  • Wait five minutes.
  • Locate and run MCG Software Center on your Windows desktop.
  • Install the latest version of Java (JRE) and User Check.

Attempt #1: Test MCtime

  • Try to access MCtime and log in. See if you can pull up a timecard to edit successfully. if you cannot, continue down this troubleshooting list.
    Note: If you are telecommuting, ensure that you are connected to the VPN before continuing to troubleshoot with the Software Center.

Deployment Text File

  • Open a Windows folder (either through File Explorer or any folder you have in Windows).
  • Navigate to C:\Users\[your_username]\App Data\Local Low\Sun\JAVA\Deployment\ and delete the deployment text file.

Attempt #2: Test MCtime

  • Try to access MCtime and log in. See if you can pull up a timecard to edit successfully. if you cannot, continue down this troubleshooting list.
    Note: If you are telecommuting, ensure that you are connected to the VPN before continuing to troubleshoot with the Software Center.

Setting up a New VPN Connection (County Laptop)

Have you been granted VPN rights, but now you don’t know the first thing to do? Here is your next course of action.

(Note: This presumes you’ll be using a county laptop to connect to the network, but won’t need to connect to a desktop in your office from that laptop.)

Set up Pulse Secure

  • Find and double-click MCG Software Center on your desktop. (This is only on county computers and you will not find this on your home computer.)
    Software Center Icon


  • Find and click to install Pulse Secure Client from the list. Go through the installation.
    Pulse Secure SW Center Icon


  • Run Pulse Secure. We now need to establish a connection (something you’ll do only once, as you will just use that saved connection after this point). The screen should show an empty list of connections and we’ll add one.
  • Click the plus (+) button in the Pulse Secure window to add a connection.
    Pulse Select Connections Header


  • Add the necessary info:
    • Type: (use the default Policy Secure or Pulse Secure).
    • Name: Call this whatever you would like. I recommend MCG or VPN.
    • Server URL: https://secure.montgomerycountymd.gov (unless DTS told you your server is secure2, in which case it would be secure2.montgomerycountymd.gov)
  • Click the Add button.

Connect to the VPN

  • Launch Pulse Secure (if you have not already).
  • Find the saved item for the county VPN and click the Connect button.
    County VPN Connection


  • Input your county single sign-on username and password (i.e., what you use to log into Windows in the office) when prompted and click the Connect button.
  • Wait for the connection to be made successfully. You will know it was successful if you see the green check mark next to the name of the saved connection.VPN Connection Successful


Disconnect from the VPN

  • Click the Disconnect button in the Pulse window when you are finished with county servers and want to disconnect.