Want to set up the hose testing application? Need to use it? Click here for the instructions.
Enabling Visio to Open FRS Stencils (Shapes)
Visio 2013, be default, will block the FRS Stencils/Shapes (which include gas, electric, connections, north arrow and more) since they were created in much older versions of the program. Follow these steps to tell Visio they are acceptable files to open. (Note: This must be done within the profile of anyone who logs in to use Visio for mapping, not just once per computer.)
- Run Visio.
- Click Blank Drawing and click the Create button.
- Access the File tab and click Options at the bottom of the left-hand navigation.
- Click Trust Center at the bottom of the left-hand navigation on the pop-up window.
- Click the Trust Center Settings button on the right side of the pop-up window.
- Click File Block Settings on the left side navigation.
- Uncheck the boxes for all three rows. (A checked box means Visio should block it, not unblock it.)
- Click the two OK buttons.
Noting the Different Response Dispatches for PICs on Limited Access Highways (Such as I-270 and I-495)
Thanks to a new upgrade in CAD, response dispatches for PICs on limited access highways (such as I-270 and I-495) are different and more user-friendly. The alt-lane dummy unit is a thing of the past and in its place will be an alternate lane marker that follows the units assigned to the alternate (opposite) assignment, such as A703 (ALT). This will be seen on the CAD and MDCs.
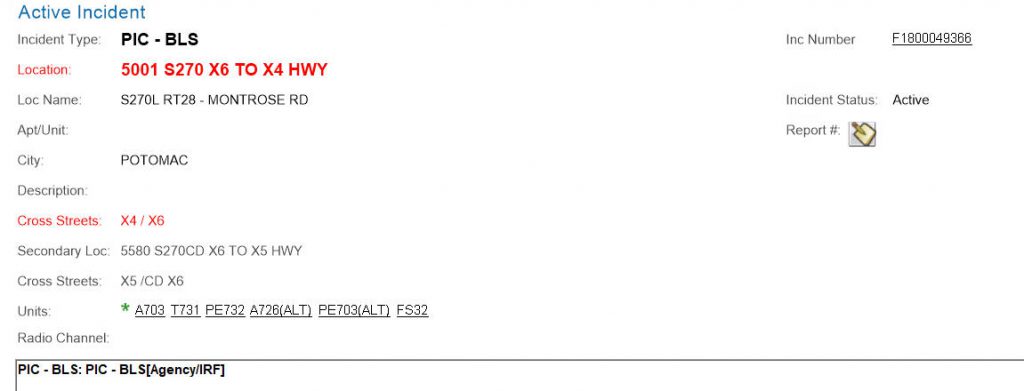
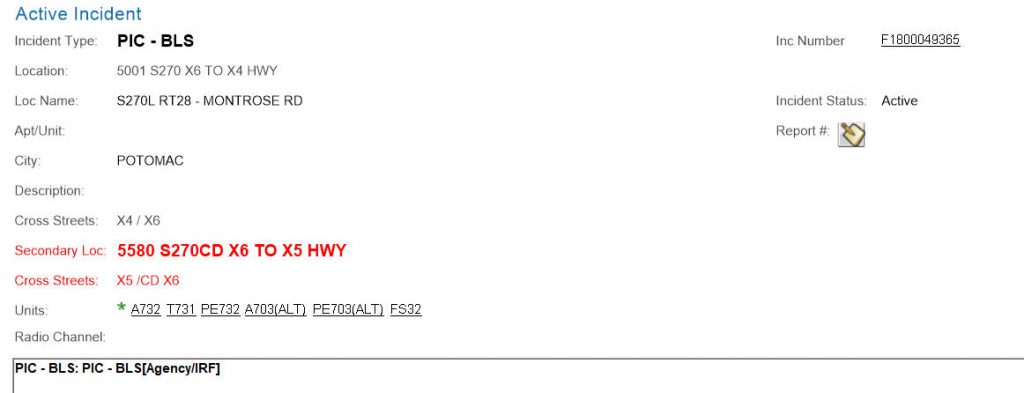
Moving forward, we have two different dispatches for units; you’ll just receive one but which one will determine where you should go. To reiterate: Just go where you’re dispatched (which is the text in red).
Scenario: There’s been a PIC on southbound 270 between 28 and Montrose Road.
The primary unit(s) will see this:
The alternate unit(s) will see this:
Also: 270’s commonplace names have been updated to include express lanes and local lanes (to match highway signage).
Fixing Your Browser to Run Hydrant/System Reports
Trying to run the Hydrant/System reports from Quicklinks but your browser isn’t cooperating? Similar to the fix for MCtime, try this:
- Expand the Operations Division menu on Quicklinks.
- Click Hydrant/System Reports and bypass the county pop-up warning or wait for it to close automatically.
- Note whether the reports window loads properly or fails. If the latter, proceed with the following:
- Click the Settings Gear icon in the upper-right corner (or press Alt-T on your keyboard to access the Tools menu in Internet Explorer).

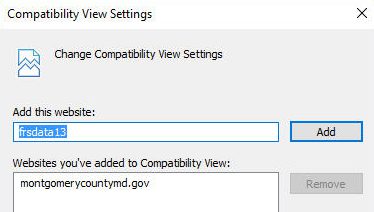
- Choose Compatibility View Settings from the list.
- Note that frsdata13 should appear in the top box; this is the name of the report server.
- Click the Add button. The name of the report server should move to the lower box, where it will either be alone or join montgomerycountymd.gov, the necessary addition to run MCtime.
- Click the Close button and the report window should load properly.
Viewing Only Certain Priority Incidents on the P1 Incidents List
The P1 MDC Incidents list can be long. Suppose you want to see only the incidents of priority 4 and lower (as the list goes up to priority nine).
- Click the Incident button on the right side of the screen.
- Click the Filter button at the bottom of the screen.
- Check the Priority box.
- Set the Operator as Less than or Equal to and input a Value of 4.
- Click the Add button and then the Filter button.
Note: The filtered list you created is a snapshot and will not update the main list.
Finding Street Names and Hydrants on the P1 Map
Struggling to locate street names on the P1 map? Zoom into the sixth layer.
How about hydrants? Same layer.
Sending a Message to ECC via P1 MDC
Need to contact someone at ECC while you are on an incident? No need to remember any workstations or who’s who with P1 MDC!
- Go to the Mail feature, click the New button at the bottom of the screen and choose Message.
- Click the To button to select a message recipient.
- Choose My Dispatcher, which should be located at the top of the list.
- Click the right arrow/triangle button to address the message to My Dispatcher.
- Click the OK button.
- Fill in the message as needed and click the Send button at the bottom of the screen.
Note from the ECC leadership: The My Dispatcher address goes to all at ECC. For our own procedures, we do not want messages targeting individuals, as was the standard in the previous CAD.
Accessing a Resource Account via Outlook (OWA) 365
- Obtain rights to the resource account you need to access.
- Go to Quicklinks and click the E-Mail button.
- Sign into e-mail as yourself (Windows login if you’ve never used that sign-in page).
- Click your name in the upper-right corner.
- Find and click the link below your name (in the panel that just expanded) that says Open another mailbox.
- Type in the name of the mailbox you want to open in the box that pops up.
- Note that, as you type, Outlook is searching for accounts close to the name of whatever you’re typing.
- Find and click the mailbox you would like to open and have rights to access.
- Click the Open button. The other mailbox will open as a separate tab (or window, depending upon your browser settings).
- Use the mailbox as you would your own.
Finding a Preplan When Not on an Incident
Preplans are listed in the premise/hazards section. If we’re not talking about a building related to a particular incident, you can use the Prem/Haz feature to search by whatever location/address you like. (If it is while on an incident, just click the Prem/Haz button the left side of the screen when you have the individual incident loaded in front of you).
- Click the Prem/Haz button on the right side of the screen.
- Key in the address and click the Verify button.
- Change the agency from F to All (which includes C and F – I believe that preplans are related to C, which stands for Communications or ECC).
- Double-tap the preplan when it comes up in the resulting list.


