Utilizing Virtual Desktops

With Windows 10, the user can create an unlimited amount of Virtual Desktops.  Virtual Desktops allows the user to:

  • Group or organize multiple programs or group related windows
  • Locate and switch to any window or group of windows
  • Re-organize groups and move windows as tasks evolve
  • Control of the degree of separation between your grouped windows

The virtual desktops feature in Windows 10 is called Task View and is located on the Taskbar.  To add a virtual desktop:

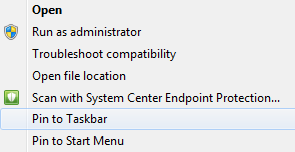
  • Open up the new Task View pane by clicking the Task View button (two overlapping rectangles) on the taskbar,  TASKBAR
  • Click New desktop to add a virtual desktop.

or

  • Pressing the Windows Key + Tab

Windows_10

or

  • Press the Windows Key + Ctrl + D


Clicking the Task View button brings up the Task View interface, where you can see your open windows on virtual desktops you’ve added.


You can move programs among the different desktops you’ve set up.

To do so:

  • Switch to the desktop containing the program you want to move.
  • Click the Task View button on the Taskbar.
  • Right-click on the large thumbnail for the program you want to move
  • Select “Move to,” and then select the desktop number to which you want to move the program.

07_moving_a_program_to_another_desktop

The program now displays on the other desktop.


Windows 10 Keyboard Shortcuts

With Windows 10, Microsoft has added new keyboard shortcuts to give you easier access to the new Action Center, Cortana, Task View, and virtual desktops.

Listed below are a few of the most common Windows 10 keyboard shortcuts:

  • Press Windows key: Open/close the Start menu
  • Press Windows key + A: Open the Action Center
  • Press Windows key + C: Launch Cortana in listening mode (for voice commands)
  • Press Windows key + (Windows 7 and up): Launch File Explorer
  • Press Windows key + I: Open the Settings app
  • Press Windows key + S: Launch Cortana
  • Press Windows key + Tab: Open Task View
  • Press Windows key + Ctrl + D: Create a new virtual desktop
  • Press Windows key + Ctrl + F4: Close the current desktop
  • Press Windows key + Ctrl + left or right arrow: switch between virtual desktops


Battery Saver Settings

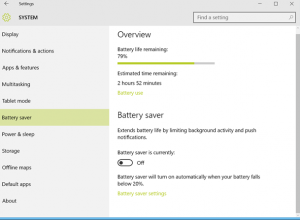
If you are utilizing a laptop and the battery is starting to run low, Windows 10 will begin to cut back on background services and other threads so you can squeeze more out of your battery life.

To enable Battery Saver:

  • Click on the Start menu
  • Click on Settings
  • Choose Systems
  • Choose Battery Saver

Battery Saver


The screen also shows how much battery life and estimated time you have remaining.

Starting a New IPPA Document without the Default Read-Only Limitation

Several officers have found that the IPPA documents found on Quicklinks are saved as read-only and then they have difficulty using (and editing) the documents. Here is your workaround:

  • Go to Quicklinks, expand the Human Resources Division menu and click the IPPA Forms and Documents link (or just click it here).
  • Find the rank-level evaluation you need on the right side of the page.
  • Click the link to download the file (likely saved to your Downloads folder). Alternatively, you may right-click the link and select (Save As…) to save the file in a specific place of your choice.
  • Go to the location of the saved document and double-click to open the document. Note the pop-up:
    Read Only Pop-Up
  • Click the No button to indicate you don’t want the document to be read-only.

Note: Some versions of Word will also prompt you with an Edit Document button near the top of the screen in the View tab. If you see that, click it.

Finding Your Way Around the New Quicklinks Navigation

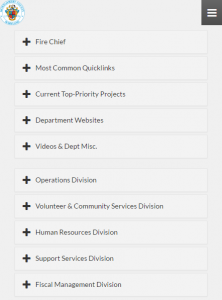
Wondering where things are in the new Quicklinks menu structure? This TechTip is a guide for you.

Search Bar: Unfortunately, this search bar is not limited to Quicklinks. If you are going to run a search to find what you need, precede whatever keyword with Quicklinks (e.g., Quicklinks Safety) in order to narrow your search to the Quicklinks site.

Top Row Links: These are a handful of the most commonly accessed links so you won’t need the expandable menus at all to access email, MCtime, etc.

Expandable Menus: The 10 menus provide links in an organized manner.

The left side includes:

  • Fire Chief: FCGOs, IBs, Policies and Procedures, etc.
  • Most Common Quicklinks: While some of these items are also on the top row links, the list is slightly longer here. Find the most accessed links conveniently in this one place.
  • Current Top-Priority Projects: What’s most important at the moment? What training is required for all personnel at the moment (e.g., Annual Recerts)? Find the links here. The list will change as department needs change.
  • Department Websites: Can’t remember the address for the main public website? How about the public information (SION) website? Webstaff? Tech Training? Find those and more here.
  • Videos and Department Misc.: Looking for the latest fire chief’s video?

The right side includes:

  • Operations Division: From management tools (DOC Log, Apparatus Tracker, etc.) to links for the Operations sections, Roster/Transfer Info (Battalion Roster, station vacancy page, etc.) and the station commanders’ reference guide, your Operations links needs are generally met here.
  • Volunteer & Community Services Division: The DOVS QL homepage is here, a wealth of information and links for volunteers. As the division contains Community Outreach, public education links are now here.
  • Human Resources Division: If it pertains to HR-related information you typically found in the Forms and Documents page in the past, it may be here. Examples include the AWOL report, IPPA forms and documents, PRL/FMLA submission forms, etc. Other sections of the division include FROMS, Recruiting, Safety and the Training Academy. (There are over a dozen links for commonly access information and websites, such as OTSR registration, driver training, COPDI, etc.)
  • Support Services Division: Need to find basic information on the Logistics section? How about the Tech Training Blog for an archive of TechTips? Here is where you need to be.
  • Fiscal Management Division: Find the expense voucher, mileage reimbursement form and more. If it pertains to money, this is a good place to start.
Quicklinks Menus

Quicklinks Menus

Quicklinks Phone Menus

Quicklinks Phone Menus

Hiding and Showing the Left Pane in FireApp on the MDC

With the implementation of FireApp on MDCs, there is one minor change to the look and feel of the program (and it only shows up on the MDC version).

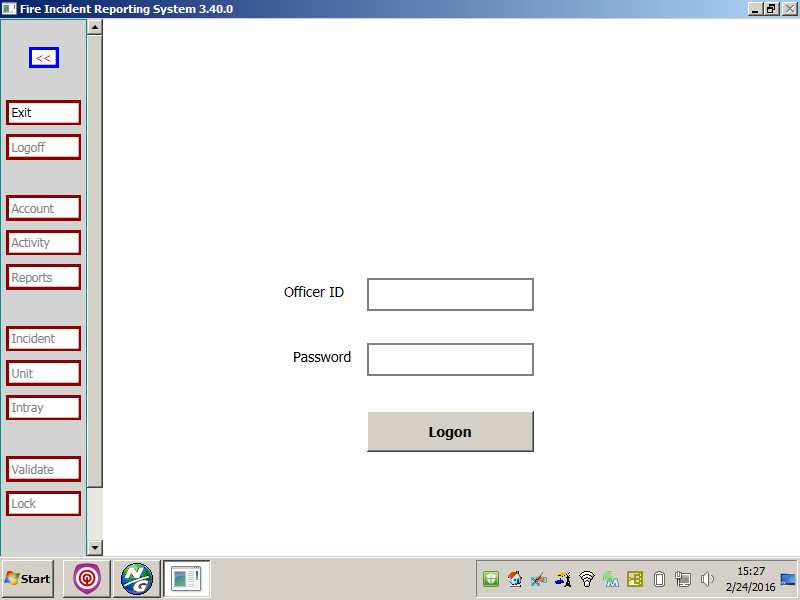
When you launch FireApp on the MDC, note the left pane:

FireApp Logon Screen MDC


The left-pointing double arrow, located above the Exit button in the left-side panel, will enable you to minimize the left pane and give you more room to work in FireApp (so you don’t have to scroll to the right side of the screen).

To see the full buttons again in the left pane and restore the full panel, just click the right-pointing double arrow.

FireApp Arrow Right


Until you get used to knowing which buttons are Validate and Lock without seeing the full buttons, you may want to use the new arrows.


Changing Outlook 365’s Reply Default Setting

With the recent (Fall 2015) changes to Outlook 365, the Reply button defaults to Reply to All, frustrating many and generally promoting bad netiquette. Here’s how to change the default:

  • Log into Outlook 365.
  • Note the default reply option on your O365 toolbar.

    Reply Drop Down Arrow
    (Note, if you wanted to keep things as they are but just choose alternatives based on the e-mail message, simply click the drop-down arrow).

  • Find and click the Settings icon in the upper right-hand corner.

    Settings Cog 

  • Select Options.
  • Choose Reply Settings.
  • Change the default setting from Reply All to Reply instead and save.

    Reply Setting