Approving of Denying Working out of Class Entries

Effective 07/01/2022, all tracking for working out of class is now performed via the FireApp Working out of Class (WOC) module.

Scenario: You have received e-mail, indicating that someone you supervise has submitted an entry for working out of class.

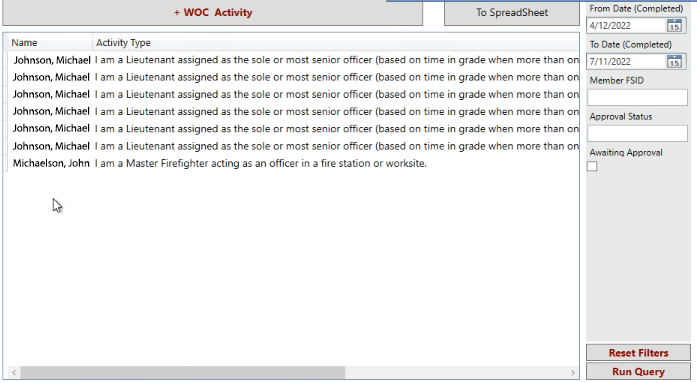
  • Log into FireApp and click the WOC button, located near the bottom of the left-side navigation. You will see any entries which require your attention. (Note: Do not reply to the e-mail you received about the WOC activity to be approved; they are not monitored.)
    WOC Data List for Officer
  • Click to select the one which you would like to approve or deny.
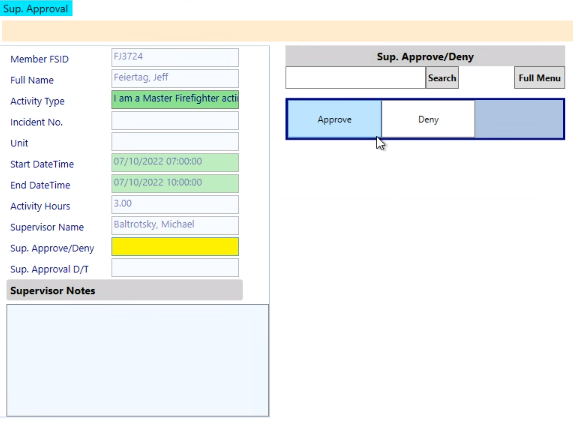
  • Review the details for the submission and click either the Approve or Deny button.
    WOC Approve and Deny window
    Note: You may not approve any entry that is greater than 24 hours, excluding Daylight Savings.

Entering Out of Class Hours in the FireApp WOC Module

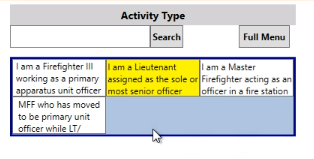
Have you worked out of class (F3 as a primary apparatus officer, MFF as an officer in a station, MFF to primary unit officer while LT or LT as the sole or senior-most officer)? Effective 07/01/2022, out-of-class tracking is now done through FireApp’s Working Out of Class (WOC) module.

  • Log into FireApp.
  • Click the WOC button, located near the bottom of the left-side navigation panel.
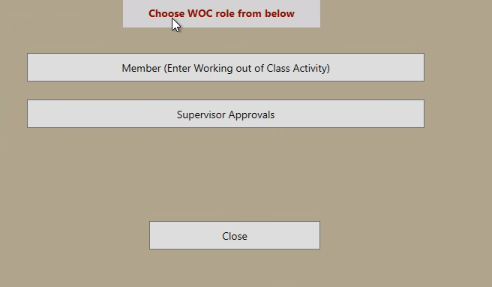
  • Click the Member (Enter Working out of Class Activity) button.Working out of Class Role Selection
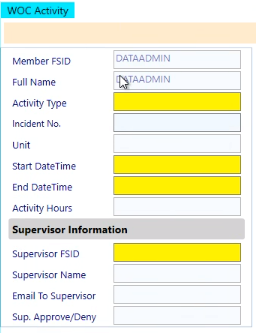
  • Fill in the necessary fields.
    New Working out of Class Entry
  • Note the following:
    • Activity Type: Select one of the four options.
      Working out of Class Entry Rank Options
      Note: The Firefighter III as a primary apparatus unit officer option will require you to select the specific incident and unit on which you worked out of class.
    • Start DateTime and End DateTime: Identify the period in which you worked out of class in this role. This entry must be equal to or less than 24 hours. If you enter a time range which is greater than 24 hours, your supervisor is directed to deny the entry, except for daylight savings. (If you need to enter time for the period after 24 hours, such as for an incident than ran over into the next day, simply input a second entry for that next day’s activity.) Since tracking is now performed through the FireApp WOC module, you may enter hours that occurred prior to the last six months (plus a 10-day grace period), factoring in a rolling six-month period.
    • Activity Hours: This field will auto-calculate, based upon the start and end times.
  • Click the Send to Superv(isor) button, located at the top of the screen.
    WOC Send to Supervisor Button
    Notes:

    • This will send e-mail to your assigned supervisor. If your supervisor is on extended leave or you need to change supervisors for some other reason, you may search for another officer by using the Supervisor FSID field.
    • If you make a mistake and switch to another FireApp module (effectively saving this entry without sending it to your supervisor), you may return to the WOC module and continue the entry. Additionally, if you made an error and want to have the record removed from the database, simply submit a TSR to request the entry be deleted. Please be as specific in the description as you can.

Using the PPE Quarterly Inspection Form

MCFRS has moved the PPE Quarterly Inspection Form to Jotform. While it is mostly self-explanatory, please note the following:

  • The form may be accessed via Quicklinks (Support Services menu) or by direct link here.
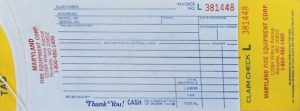
  • Pictures may be added to the bottom of the form. The images should be of the tag that is filled out and returned by Maryland Fire. An example of a ticket (although not filled out) is below:
    Maryland Fire PPE Ticket Example

    Note: Please place the two tags side by side for you to take your picture before submitting.

Viewing SeamlessDocs Submission Attachments

Did you receive a SeamlessDocs message, indicating you need to approve a form which may have some attachments? Would you like to view those attachments to determine if you should sign?

  • Receive the e-mail, requesting your signature and click the Sign Document link or button, as directed in the message.
  • Wait for the browser to load your form.
  • Click the paper clip (attachments) icon.
    Paper Clip icon for Attachments
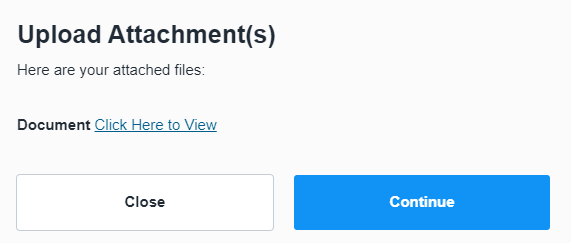
  • Note that the Upload Attachments window appears. It is nearly identical for someone who needs to attach a file as it is for someone who needs to review a file.
    SeamlessDocs Upload Attachment Dialog Box
  • Click the link labeled Click Here to View (as opposed to Click Here to Upload). The file will either open in a new tab or download to your default download folder (typically the Downloads folder).

Running the ePCR/Elite Cache Clear

EMIHS has made a change to speed up the load time for eMEDS/Elite. (It will also clear out the dashboard. The down-side to that is that, when it runs at 0300 hours each day, it will also clear out the unit and crew. If you run any calls between 0300 and shift change, please re-input your information as needed.)

If your system seems to be running slowly throughout the day and you would like to run this process on your own:

  • Log out of Elite.
  • Find and double-click the BrowserClear shortcut on the Windows desktop.
    ePCR Browser Clear Desktop Shortcut
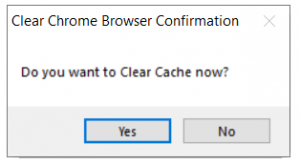
  • Note the window that appears and click the Clear Cache button.
    ePCR Browser Clear Warning
  • Click the Yes button if you would like to proceed. (If not, click the No button and close the Clear Cache box you saw before.) You will know the process is complete when the window disappears.

Getting Rid of the News and Entertainment Posts in a New Edge Tab

Are you using Edge and finding that, when you start a new tab, you see all kinds of news and entertainment posts? Do you just want a basic search page, instead?

  • Open Edge.
  • Click the three dot button at the far right and choose Settings.
  • Click Start, Home and New Tabs on the left side of the screen.
  • Find the New Tab section at the bottom of the page.
  • Find the first item in that section, Customize your new tab page layout and content, and click the corresponding Customize button.
  • Note that your tab loads with all of the news and such.
  • Find and click the gear icon at the top-right corner of the page.
  • Click Focused.

Updating Software Center to Show Most Recent App Availability

Are you trying to find something in the Windows Software Center, which you know should be there but is not? Here are directions to update Software Center to show the most current list of available apps.

  • Close Software Center, if you have it open.
  • Click the Windows start button (at the bottom-left of your taskbar) and type Control, but do not press the Enter key.
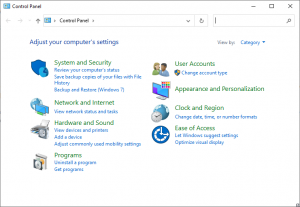
  • Find Control Panel in the resulting list and click it, in order to open it.
    Control Panel choice in Windows
  • Wait for the Control Panel window to open, and then find the search box at the top-right corner of the window. Click in the search box.
    Control Panel
  • Type Config and you’ll see Configuration Manager appear as an option. Click the Configuration manager link
    Configuration Manager Option
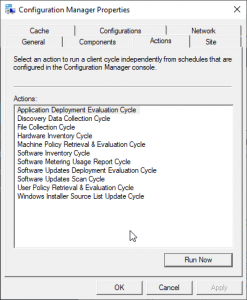
  • Wait for the Configuration Manager Dialog box to appear and then switch to the Actions tab.
    Configuration Manager Dialog Box
  • Find and click Application Deployment Evaluation Cycle in the list and then click the Run Now button, located at the bottom-right of the dialog box. Wait for that process to finish.
  • Find and click Machine Policy Retrieval & Evaluation Cycle in the list and then click the Run Now button.
  • Click the OK button and then close the Control Panel.
  • Re-launch Software Center as desired.

Choosing the Right TSR Category

Trying to determine which TSR category fits your help request? Here is a handy guide to get you started. This post will be updated over time. As a reminder, TEBS has recently reorganized a number of key teams and as a result you are reminded that all IT requests should be routed through TSR and the MCFRS Technology Section.

CategoryWhat is Covers
Apparatus HeadsetApparatus Headset
Applications/Software - DataIssues with Logistics App, Personnel App, EMSQA, FF Time Tracking, WOC, etc.
Applications/Software - InstalledInstalled software not working correctly.
Applications/Software - Mobile AppsMobile apps for phones or tablets (Handtevy and PSTrax). NOTE: This does not include Active911 and MCEN.
Applications/Software - Web-BasedBatt Lineup, DOC Log, MCtime, PCAP, PIMS, SharePoint, WPM, etc.
Axon Body CameraAxon Body Camera
Axon Dash CameraAxon Dash Camera
Cable TV ServiceCable TV Service
CAD System & Hardware (Including CAD Mapping and ECC Phones)CAD (ECC and Field), CAD Mapping, ECC Phones, etc.
Data Systems & RequestsData Warehouse, data reports, data mining, response data report requests, etc.
Detectors/MetersDetectors/Gas Meters
Email ServicesOutlook accounts (existing and new requests), distribution lists, groups, etc.
Email Services - ALS OnlyE-mail issues related to ALS personnel
ePCR System & HardwareePCR/Elite system, software and hardware, etc.
Fire Station AlertingFire Station Alerting
Fire Station AudioFire Station Audio
FireApp (or other RMS Issues)FireApp server, software and hardware
FirstNet Subscriber PayFirstNet Subscriber Pay
GPS SystemsGPS Systems
Hardware/Software - License or Purchase RequestAll requests to buy hardware or software, including web-based product licenses (triggers an additional form for you to submit)
IT Exemption RequestRequest for an exemption to an existing FRS and/or TEBS policy (triggers an additional form for you to submit)
Meeting Video Recording RequestRequest to record a Teams, Google or Zoom meeting
Messaging (Active911, MCEN, CMsg)Active911 and MCEN account requests and issues with existing accounts
Mobile Data (MDC)MDC software and hardware
Multi-Factor Authentication (MFA)MFA conection problems, requests for key fobs (activate and deactivate)
Network Systems (Including network drives & VPN access)Network drives, connectivity problems, VPN (access issues and new account requests)
Phone Number UpdatesUpdate your desk or cell phone number in the centralized list
Radio Consoles (ECC)Radio Consoles (ECC)
Radio System InfrastructureRadio System Infrastructure
Radios and EquipmentPortable and mobile radios, speaker mics, DVRS issues, etc.
Station Video CamerasStation Video Cameras
Technology HardwareDesktop computer issues, peripherals (monitor, printer, webcam, etc.) and network printers
Technology Training Site & Tracking SubsitesSystem access, transcript problems, training data tracking, etc. for the main tech training website and all tech training project subsites
Telecomm Services & HardwareDesk phones, cell phones, SONIM phones, etc.
TeleStaff System & HardwareTeleStaff System & Hardware
Tone Alert PagersTone Alert Pagers
Web-Based FormsChanges to existing web forms (Jotform, SeamlessDocs, etc.), new form requests, access to forms
Website Changes & IssuesWebsite edit requests
WindowsWindows

Changing Your Tech Training Password

Can’t remember your tech training password and/or just want to change it? Here are the steps:

  • Go to the tech training website.
  • Find and click the Reset Password link, located near the top-right of the screen.
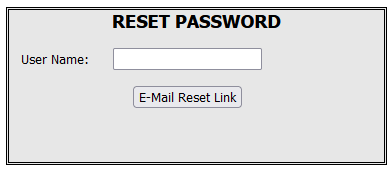
  • Note the box that appears:
    Password Reset Box 1
  • Input your username and click the E-Mail Reset Link button. A message will be sent to the e-mail address on file with your tech training website account. (If that e-mail address is no longer valid, please contact Jeff Feiertag (jeff.feiertag@montgomerycountymd.gov) to update the address.
  • Find the message in your e-mail account. (If you do not see it, please check your junk/spam folder).
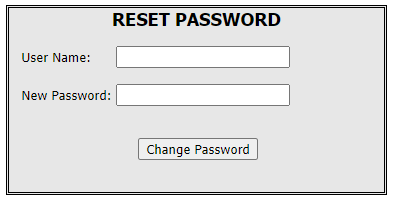
  • Click the link provided in the e-mail message. This will take you back to the website to show the following box:
    Password Reset Box 2
  • Input your username again, followed by the new password of your choice. Please use at least eight characters and the following:
    • At least one upper-case letter
    • At least one lower-case letter
    • At least one number
    • At least one special character
  • Click the Change Password button and verification will be sent to the same e-mail address on file.


Configuring Edge to Work in IE Mode for MCtime on Non-County PCs

Are you hoping to set up Edge at home, so that you may use it to work on timecards? It needs a few tweaks and FRS Technology has tried to simplify the process for you. (Note: Only someone who has administrator rights on a PC can perform this process successfully.)

  • Download the file Edge-IE.zip from the tech training website. Remember where you save it on your computer, such as the Windows desktop or the Downloads folder.
  • Find and double-click the file to open it in an unzip utility (such as 7-Zip or WinZip).
    Zip folder
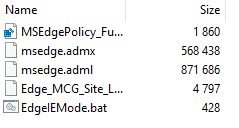
  • Double-Click the Edge-IE folder folder to expand it.
    Zip folder expanded
  • Press Ctrl-A on your keyboard to select all of the files.
  • Click the Extract button and either choose a new location or proceed with the default location to save the files (which will likely be the same location you selected earlier).
  • Close the zip utility.
  • Open a folder (through the File explorer or any other desktop folder) and go to the location where you just extracted your files.
  • Double-click the file called EdgeIEMode.bat.
  • Open Edge and access timecards as needed.