Adding Your Own Custom Background to Teams

Would you like to use your own custom background in Teams, instead of one of the default images?

Create an image (1920×1080 is the recommended size) and save it to the following location:
%APPDATA%\Microsoft\Teams\Backgrounds\Uploads

Click the Background Settings button when you are about to enter a meeting and scroll toward the bottom of the Background Settings pane.

Click on the image of your choice and then click the Join Now button to enter the meeting.
Changing Your Background in a Teams Video

Are you using Teams for video meetings? Here is how to change your background to one of the available built-in images.

Click the Join button to enter your meeting pre-stage screen.

Find and click the Background Settings button, located beneath the Join Now button in the video preview screen.

Teams BG Image Button


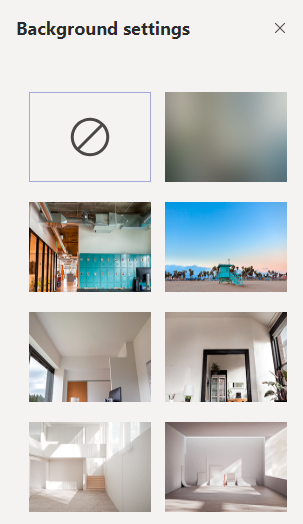
Note the Background Options pane that opens on the right side of the screen.

Click the background of your choice. The first in the list (circle with a slash) will cancel the background image and show your actual environment. The second item will show only a blurred background. All other options are images you may choose. After selecting an image, click the Join Now button to enter your meeting.

Disabling the Tools Pane Permanently in Adobe Reader

Are you trying to open a pre-plan PDF on your MDC and Adobe Reader insists on taking up the right side of the screen with an extra pane? Here’s a tip to turn it off permanently so you have more space for your PDF.

  • Hide the Tools pane, as you normally would.
  • Access the Edit menu and select Preferences.
  • Click the Documents side-tab, and then check the box for Remember Current State of Tools Pane.
  • Click the OK button.


Setting up Rules in Outlook Desktop

Getting flooded with messages that you don’t want and all have a common theme (from the same person, the same subject, etc.)? Outlook enables you to set up a rule to clean it all up in one fell swoop.

  • Right-click one of the messages.
  • Select Rules and then Create Rules.
  • Click Advanced Options in the dialog box that pops up. The advanced options will give you more control with your rule than just the few options first presented.
  • Choose a condition, such as the subject containing certain text. (Since you right-clicked a specific message, the sender and subject should appear in the options from which you’ll choose.)
  • Click the Next button.
  • Choose what you want to do with the message, such as delete it. (If you just want to file the messages away and read them at a later time, choose to move the message into a folder.) Click the Next button to continue.
  • Add any exceptions (although this is rare).
  • Specify a name for the rule. This takes the theory that you may have several rules as time goes by and naming a rule with something obvious means you won’t need to go into the rule details to determine why you created it in the first place.
  • Click the Run this rule now on messages already in the inbox checkbox. This is crucial for cleanup when you have been plagued by a lot of messages for which you are writing a rule.

Conducting a Phone Call with a Contact from the Calls Section

Need to have a phone call with one of your contacts? Teams enables you to use your computer for voice-over-IP (VOIP) phone calls and a real advantage tot his approach is the ability to hare your desktop and show the other person your document while you work on it. The speakers and microphone on your computer must be enabled for this to work (and the same goes for the other contact’s computer).

Switch to the Calls section of Teams

Calls Button


Find and click the Make a call button in the lower-left corner of the screen.

Note the field that emerges, the Type a name field.

Make a Call


Type in the name of the individual you would like to call and press the Tab key, once the name is selected.

Add more people to the call as needed.

Note the row of buttons that appears when you click on the name.

Call Buttons


Click the icon resembling a phone.

Note: While Teams is making the call, most of the screen will be filled with the contact’s avatar or initials. Also, a floating navigation bar for the call will appear near the bottom of the screen:

Call Navigation


  • The camera button (with a slash through it) indicates this is not a video call and the web camera is not in use (if you have one).
  • The microphone hows your microphone is enabled. Click it to mute at any time.
  • The button resembling a monitor with an arrow (which would be enabled, once the call is answered) will enable you to share your desktop with the contact for the call.
  • The red phone button enables you to end the call.

Conducting a Phone Call with a Contact from the Chat Window

Need to have a phone call with one of your contacts? Teams enables you to use your computer for voice-over-IP (VOIP) phone calls and a real advantage tot his approach is the ability to hare your desktop and show the other person your document while you work on it. The speakers and microphone on your computer must be enabled for this to work (and the same goes for the other contact’s computer).

Switch to the Chat section of Teams

Chat button


Locate the person i your contacts list you would like to call.

Find and click the phone icon in the upper-right corner of the screen. Teams will call the individual.

Phone Icon


Note: While Teams is making the call, most of the screen will be filled with the contact’s avatar or initials. Also, a floating navigation bar for the call will appear near the bottom of the screen:

Call Navigation


  • The camera button (with a slash through it) indicates this is not a video call and the web camera is not in use (if you have one).
  • The microphone hows your microphone is enabled. Click it to mute at any time.
  • The button resembling a monitor with an arrow (which would be enabled, once the call is answered) will enable you to share your desktop with the contact for the call.
  • The red phone button enables you to end the call.

Starting a Text Chat with a Contact

Teams offers a text chat/instant messaging feature and the process is simple:

Switch to the Chat section in the left-side navigation.

Chat button


Click once on the contact of your choice to select the correct person. Note the colored circle at the bottom-right of the person’s avatar (or initials), located to the left of his/her name.

Contact Name


  • Green: Available
  • Yellow: Be Right Back/Appear Away
  • Red: Busy/Do Not Disturb

Find and click in the chat text box at the bottom of the screen.

Chat Text Box


Type your message and press the Enter key on your keyboard. Wait for a reply and type in this same box. The text thread will appear in the main window.


Setting up Contacts in Teams

New to Teams? In adding contacts of people, you may want to consider grouping them. For example, maybe you want to lump all of the people in your section together, while you have another for a different section entirely.

Click the Chat icon in the left-side navigation.
Chat button


Find and click the Create a new contact group button at the bottom of the screen, on the left side of the window.
Teams Create New Group Button


Type in the name of the group (e.g., FRS HR) and click the Create button.

Find and click the group header you just created. Now, it’s time to find and add people to the group.

Click the ellipsis (three dots) to the right of the group name.

Choose Add a contact to this group.

Teams Add a Contact


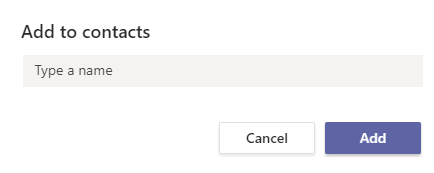
Input the name of your colleague and click the Add button.Teams Add a Contact


Repeat the last few steps to add more people.