Author: Jeff Feiertag

Setting up Rules in Outlook 365

  • Log into Outlook and find a message for which you would like to create a rule.
  • Right-click the message in your inbox and select Create Rule from the pop-up list.

    Create Rule


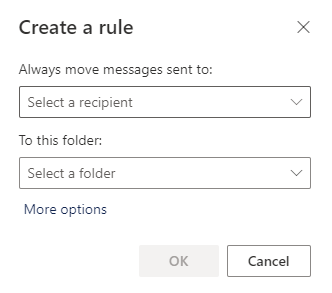
  • Note the pop-up dialog box with basic options and choose More Options.

    Create Rule dialog box


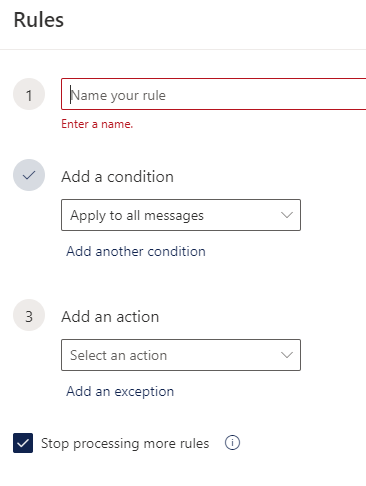
  • Fill in your options for the boxes.

    Outlook Rule Options


  • Step 1: Name your rule. As you may create more rules over time, it is good to name this rule as something obvious to you so that you know what it does when you see it later.
  • Step 2: Add a condition. For the COVID e-mail reply-all mess that occurred on 03/26/2020, I recommend choosing Subject Includes from the drop-down list and then adding the words Working from home under COVID, as that was the subject used in most of the messages.
  • Step 3: Add an Action: Choose Delete. Feel free to add exceptions if you would like.
  • Click the Save button.

    Note: Since there are a considerable number of combinations as to what you might want to do with rules, this TechTip will not offer specifics beyond this point. If you need more assistance after you have experimented with creating your own rule(s), please contact Jeff Feiertag, IT Training Coordinator.

    Also: In the web version of Outlook, this will not delete existing messages. In the desktop version of Outlook, though, you will see a checkbox option to run the rule against the inbox, which would effectively delete the entire thread at once.

Finding the Right 800 MHz Radio Fleetmap

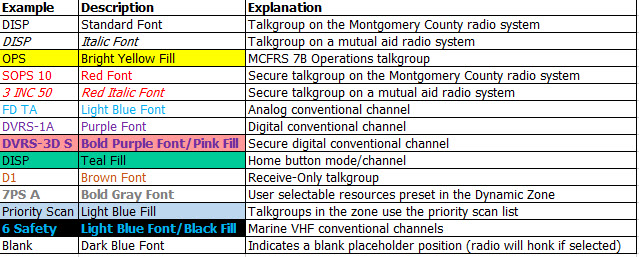
Looking for the right fleetmap? Please see the list below. Each link is a separate PDF, sized for an 8.5″ x 11″ sheet of paper. Please see below the list of links for a color-coded legend.

2024 Fleetmaps: 


Fleetmap Key

Creating a Chart Using Excel: Using the Quick Analysis Button

To Create a Chart in Excel Using the Quick Analysis Button:

  • Choose the data on the Excel worksheet that you want to include in your chart.
  • Choose the Quick Analysis icon.  A dialog box will appear on your screen.
  • Choose Charts option.
  • Preview the different types of charts by moving your  mouse over the various examples.  If you want to see more examples of charts, choose More Charts option.
  • Choose your chart layout from the options and click on it.  The chart will be inserted into your Excel worksheet.

Creating a Chart Using Excel: Using the Ribbon

To Create a Chart in Excel Using the Ribbon:

  • Choose the data on the Excel worksheet that you want to include in your chart.
  • Choose the Insert tab on the Ribbon.
  • Choose Recommended Charts on the Ribbon under the Insert tab.  An Insert Chart dialog box will display on your screen.
  • Choose a chart from the Recommended Charts or choose All Charts to see the entire library of charts.
  • Choose OK.  A chart will be created and placed in your Excel worksheet.  A Chart Tool tab will also appear on your Ribbon.
    • The Chart Tool tab will allow you to add options to your chart including titles, apply filters, or change the look of your chart.

Using AutoSum to Total Cells Using Excel

To Use AutoSum to Total Cells:

  • Choose the cell where you would like to display the total.
  • Choose the Formulas tab on the Ribbon.
  • Choose the AutoSum option on the Ribbon under the Formulas tab.  AutoSum will determine the formula to total the appropriate cells.
  • Hit the Enter key on your keyboard or click on the Checkmark to use AutoSum to calculate the totals.  The total will display in the cell you choose in the first step.

Applying a Function Using Excel

To Apply a Function Using Excel:

  • Choose the cell where you want to use the function.
  • Choose the Formulas tab on the Ribbon.
  • Choose the Insert Function option on the Ribbon under the Formulas tab.  An = sign will appear in the cell to let you know that a formula will follow.  A Insert Function dialog box will also appear.
  • Type the description of the function you want to use and choose Go to see a list of possible functions.
  • Choose the Function you want to use in your Excel document and choose OK.  A Function Argument dialog box will appear on your screen.
  • Choose the cells for each argument.  When you finish building the arguments, choose OK.


Creating a Formula in Excel

To Create a Formula to Perform a Calculation in Excel:

  • Choose the cell where you would like to apply the formula.
  • Type = into the cell.  You will be able to see the formula that you are inputting in its entirety in the Formula Bar, as well as in the cell.
  • Choose the cell that you would like to include as the first cell in your formula.  Excel will automatically place the cell into the formula.
  • Choose an Operator to be used in the formula (+, etc.).
  • Choose the next cell that is to be used in your formula.  Repeat the above step and this step for each cell and operator that needs to be added to your formula.
  • Hit Enter on the keyboard or the Check Mark on the Formula Bar to accept your formula.

Freezing Column and Row Titles on the Screen

To Freeze a Column and Row Title on the Screen when Using Excel:

  • Choose the cell to the right of the column and below the row you want to be visible on the screen at all times in order to freeze both a column and a row.
  • Choose the View tab on the Ribbon.
  • Choose the Freeze Panes option on the Ribbon under the View tab.
  • Choose Freeze Panes to freeze both the column and the row.  If you would like to freeze just the row of column headings, choose Freeze Top Row, or if you would like to freeze the column of row titles,  choose Freeze First Column.    Freezing Column and Row Titles does not affect the printing of the document.