Author: Jeff Feiertag

Understanding the Billing Tab in Elite

Are you at a loss with the Billing tab in Elite when you’re working on a patient report? Here is a TechTip that might help.

Elite Billing Tab


Specifically, let’s talk about the CMS Service Level field.

CMS Service Level Elite Field


When you see this field, ask yourself: What is the level of service provided to the patient during transport? (Because of how we assemble resources, it is not always obvious if a patient was transported ALS or BLS.  We need to identify if the paramedic upgraded a call or if it was downgraded to BLS.)

  • If the patient received ALS service during transport, pick any option that contains ALS (ALS1, ALS1 Emergency or ALS Level 2 – it doesn’t matter which).
  • If the patient received BLS service during transport, pick any option that contains BLS (BLS or BLS Emergency – it doesn’t matter which).
  • Disregard other choices.

Note: The choices in this field are driven at the national level but not all of the choices apply to how we do business.  We have adapted what you enter to get the information we need locally, which is why you can choose any ALS, any BLS and disregard the rest.

Viewing a Patient’s Previous 12-Lead EKGs

ImageTrend (ELITE) recently added the functionality to view a patient’s previous 12-lead EKGs and other vitals.  Here are the steps you need to take:

  • Begin entering demographic information for you patient:
    • Use as much personally identifying information as possible (minimum of 2 pieces) to identify the correct patient including Name, Social Security Number, Date of Birth, Home Address.
    • Note that, if the system finds a matching record, a yellow bar with a blue Find a Repeat Patient link will appear at the top and the Find a Repeat Patient button will turn blue — Use this button whenever possible to keep multiple patient encounters grouped together.
      Repeat PT Button


  • Click the Find a Repeat Patient button.
  • Select the proper patient from the list of possible matches.
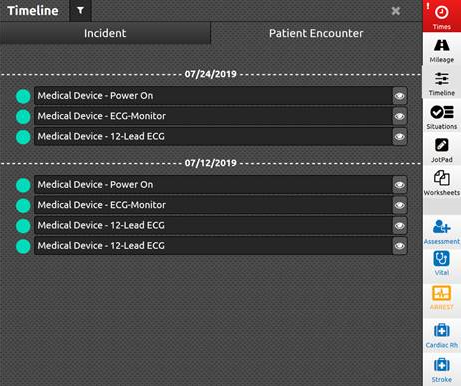
  • Click on the Timeline power tool at the right of the screen. (This allows you to view information from previous incidents, such as vitals, EKGs, previous dispatch reasons, and provider impression.)


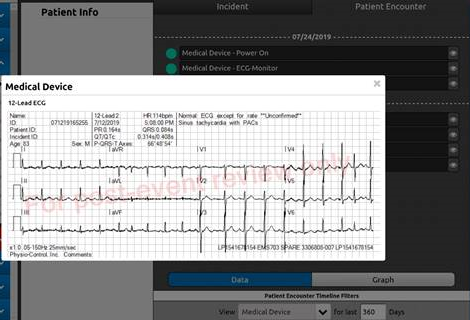
  • Select the Medical Devices in the filter criteria to view a list of EKGs, and click the eye icon to view the EKG, itself.


Questions about how to use this function may be directed to Captain Tim Burns or FF Benjamin Brighton.

Finding the Pub Ed Report Form (Wufoo)

As of July 2019, the MCFRS public education section (now called Community Risk Reduction) has moved from the Vol and Community Ed Services Division to the Office of the Fire Chief. With that move, the links for public education documentation and Wufoo form have moved on Quicklinks. Here are directions to find the new location.

Go to Quicklinks.

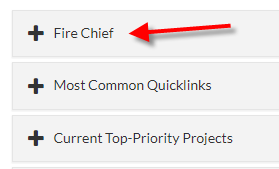
Quicklinks Fire Chief Menu


Click to expand the Fire Chief menu and choose Pub Ed Report Form.

CRR section of FC Menu


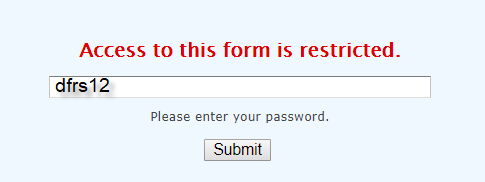
Enter the password (as shown below) and click the Submit button.

Enter the Password


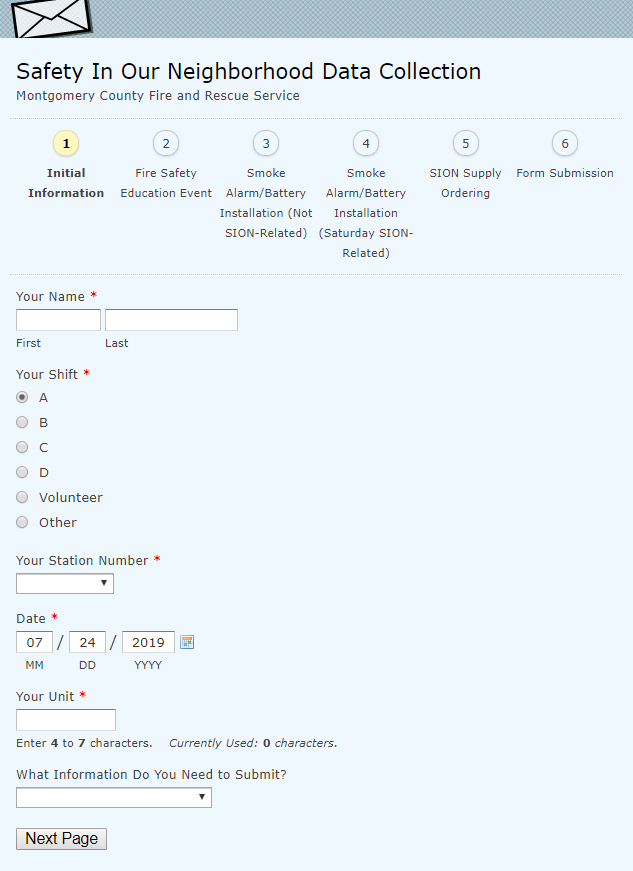
Use the form.

SION Form


Documenting Details off the Floor in MCtime (Manager Version)

Scenario: Your employee was detailed off the floor for part of a shift. You are now reviewing the timecard in MCtime.

Background: The department is now tracking details off the floor in MCtime, so that we can associate a dollar figure with the overtime required to backfill the detail. Also, any request for details will now be entered in a separate form and approved (or not) by a division chief. The approval form includes a specific reason code, as noted in the following process. See the bottom of this TechTip for a sample approval Click here to view the employee side of this TechTip.

The Timecard:

Timecard with Code for Detail and OT


The Explanation:

  • The first line (Hours Worked with a Transfer code) was originally 24 hours on Monday and was the employee’s normal shift.
  • The employee was detailed off the floor (dayside) to EMS at PSHQ and told to use FRS060EA as the Reason Code.
  • The second line, on Monday, shows ten hours for the detail toward the Reason Code.
  • The second line, on Wednesday, shows five hours in which the employee worked overtime using the same Reason Code.

Notes:

  • Do not assume that anything with a Reason Code is overtime; moving forward, that is no longer a safe assumption.
  • Take note of the Totals & Schedule tab in MCtime. As noted in the two screenshots below, Total Hrs Toward Schedule will be broken up by code. The first screenshot is for the daily view (10 hours and 14 hours) and the second screenshot is for the entire pay period (10 hours and 86 hours).

    Daily View:
    Totals & Schedule Tab

    All:

    Totals & Schedule Tab

Documenting Details off the Floor in MCtime (Employee Version)

Scenario: You have been detailed off the floor for part of your shift and need to record those hours in MCtime.

Background: The department is now tracking details off the floor in MCtime, so that we can associate a dollar figure with the overtime required to backfill the detail. Also, any request for the detail will now be entered in a separate form and approved (or not) by a division chief. The approval form will include a specific reason code, to be used in the following process. See the bottom of this TechTip for a sample approval message.

The Process for the Employee Showing the Detail in MCtime:

  • Wait until after 0830 hours the day after the detail (to allow for any leave taken to import from TeleStaff).
  • Open MCtime.
  • Add a row.
  • Input the time spent on the detail for the date of your shift.
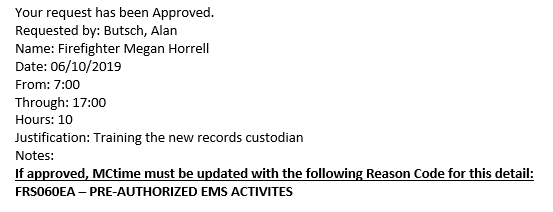
  • Add a reason code in the Transfer column (using a search, as you would to look up the code for overtime) for the detail. When the officer originally filled out the form to request your detail, (s)he provided a reason code and it would have been included in the approval e-mail message (s)he received (and hopefully forwarded to you). If you do not know what reason code to use, ask your officer.
  • Change the standard hours worked from 24.0 to whatever the difference is after you subtract your detail time. In the example screen shot below, the firefighter was detailed to work on EMS activities at PSHQ for 10 hours and so the new time spent on shift is 14.Reason Code and Time for a Detail


Notes:

  • Remember that any change you make to purple text (your default schedule) will change from purple to black and move to a different line. If you take any leave during the remaining time on your shift, TeleStaff data will import (the next day at 0800 hours) but the time on leave will not deduct from the hours worked automatically. You will need to subtract it on your own and edit the time card. TeleStaff data only makes automatic changes to time reflected in purple. If you wait until after 0800 on the day after the detail, though, the TeleStaff import works smoothly.
  • Note that overtime spent on different days in the same week with the same code will occur on the same row. There is currently no way to distinguish detailed time from overtime, except that the rest of your time spent on shift will appear as Hours Worked.

Sample Approval E-Mail Message:

Sample Authorization Message

Writing a Patient Report for the Obvious DOA

Scenario: You arrive at the scene to find the patient obviously deceased and the family member present said that the patient had a heart attack in his sleep. In this scenario, you did not attempt to resuscitate the patient. Here are the fields you will need to change in Elite that differ from the typical patient report, but this TechTip does not address all of the other fields you should be filling in that are typical of any call in your talented report writing skill.

MenuTabFieldBest Entry
Call InfoDispositionPrimary RoleNon-Transport - Other Reason
Call InfoDispositionT&T DispositionDead at Scene Without Interventions (No Transport)
Call InfoConditionsCardiac ArrestYes, Prior to EMS Arrival
Chief ComplaintDate/Time of Onset(Use, if known)
PatientChief ComplaintPrimary SymptomCardiac Arrest
PatientAssessmentPrimary ImpressionObvious Death
PatientAssessmentAssessment(Whatever led you to pronounce death)
PatientCardiac ArrestResuscitation Attempted by 911No
PatientCardiac ArrestEnd of EMS EventPronounced in Field
Provider ActionsVitalsVitals(Need one set, including 0 for pulse and 0 for respiration rate)
Provider ActionsTOR/PODCriteria for PODRigor Mortis

Checking Off Personnel in a Tech Training Subsite

Scenario: You are a career officer or LFRD training coordinator and need to check off some of your personnel in a tech training subsite for the training project of the month. (Note: Only some of the subsites offer this capability; some check-offs are based upon the individual completing a course on his/her own.) Examples include Alzheimer’s training and IRP-Spec Ops (technical rescue and water rescue).

Logging in

Go to the site, either by direct link (as provided in an FCGO or direct e-mail message from the Ops chief, for example) or via the tech training website chief section (lower-right corner of the chief main page – see the bullet list).

  • Click the Officers’ Check-Off navigation item instead of the Chiefs navigation item and you will be asked to log in. Please enter your tech training website login username and password. (Note: If you are asked again to enter the username and password — and you are positive you did not have a typo — then please contact Jeff Feiertag to have your security rights checked.)

Navigating to the Correct Check-Off Page

  • Click the link for which personnel you would like to check off for completion of training, career or volunteer. (Note: In the rare circumstance you are checking off any civilian administrative personnel, they will be found in the volunteer section, listed as MCFRS Admin.)

    Career and Volunteer Check-Off Links

  • Select the name of the course for which you would like to provide credit to your personnel. If you are on the career check-off page, please also select the battalion and shift. (Personnel not located in Battalions 1-5 are assigned to Battalion 99.) if you are on the volunteer check-off page, select the LFRD.
  • Click the checkbox next to any name you would like to provide credit. Repeat as needed until all of the personnel in that battalion/shift or LFRD for which you want to provide credit have check marks.
  • Scroll to the bottom of the page.
  • Ensure the date is correct. (It should load the current date but you may change it to reflect the proper date in which your personnel earned credit, if needed.)
  • Click the Check Off Students button.
  • Repeat for any other battalion/shift combinations or LFRDs.
  • Remember to log off of the site when you have finished by clicking the Logout link, located toward the top-left of the page.


Writing a Patient Report for John Doe (or Not)

Scenario: Your patient is unconscious and has no ID in his wallet. Aside from being the worst mime act you have seen today, you have no information on him. How to record his name in Elite?

Contrary to what some will tell you, you should not call him John Doe (or anything punny but close) when you need to input a first and last name. Doing so implies that this is his actual name and you took that specific person to the hospital, as far as the people who are analyzing the reports are concerned.*

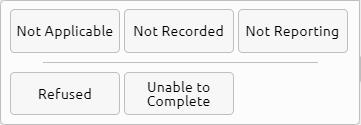
Instead, remember that you have options (Refused for people who refuse and Unable to Complete when you just don’t have the name and he is incapable of providing it).

Click the No/Not button next to the First Name.

Elite No Button


Click the appropriate choice thereafter.

Elite No Options


Repeat for the Last Name field.

Then again, if you actually run the real John Doe to the hospital, you should record the name. You just may want to reiterate in the narrative that it’s his real name.


* – Per EMS-Ops: “When you have not values available to you and you enter a name of John Doe, you are documenting that you took someone to the hospital whose name was John Doe, not that you took someone to the hospital whose name you do not know.”

Recording Meds That Are Not in Elite

Scenario: Your patient has a bottle of medicine that you need to record but one that is not in Elite. There’s no Other option in the drop-down list. How should you record it?

Click in the Other Medical History input box and add the medicine(s) there.

Other Medical History Input Box


Follow this up with e-mailing the name of the medicine(s) to Tim Burns (Tim.Burns@montgomerycountymd.gov) and he will have the medicines added to the Current Medications drop-down list. Please double-check your spelling.